Purpose
Learn how to:
- Learn how to manage metadata in SimplerQMS
Expected Outcome
- Users are equipped to handle all aspects of creating and maintaining metadata in SimplerQMS
Prerequisites for all
- Must be logged into SimplerQMS
Prerequisites for creating and configuring metadata
- Must be a member of one of these ‘User Groups’
- Metadata administrator
Section 1: Masterdata Views
Metadata is used to further describe documents and objects in SimplerQMS. Together, we refer to them as Masterdata.
All documents in SimplerQMS are tagged with metadata. Metadata makes it easier to find the information you are looking for in the vault. Regardless of the way documents are saved to SimplerQMS, you must always fill in the metadata card prior to saving the document.
Viewing of the metadata is available for all users, but only a user within the Metadata Administrator User Group can create, edit, and configure the metadata structure.
Here is a list of Metadata in SimplerQMS. To access it:
- On the Home screen, under Browse, double click on “3. Masterdata views”
- Within this view, you will be able to see all sub views that will help you navigate metadata

Note: The following Work Instruction will describe the ways individual masterdata elements can be created. As the Metadata Administrator, all masterdata information can also be created directly when creating a record, by clicking on the Add Value button while in edit mode:

Section 2: Managing Archives
There are multiple ways to create an Archive in SimplerQMS:
I. In the Create New section, on your Home Tab, click on Archive

II. Click on the Create (+) next to the Home Tab and choose Archive from the dropdown list.
III. On the left side of the screen, expand Create and click on Archive.
A Metadata Card will pop up.
Step 2.2 – Fill out medata
Part 1: General Information
| Field name | Description | Note |
| Class* | Set by default to Archive. | |
| Name or title* | Type in the name of the archive. | |
| Owning Archive | In this field you can relate your archive to a parent archive if you wish to create a sub-archive. | |
| Responsible Person* | Select the RP of the archive. This does not give additional access rights to the user selected. | |
| Description | Type in a description about the archive if necessary. |
I. Click Create after filling out all necessary information on the metadata card.
II. Click OK when you see the following box: “With the selected permissions, you will not have permission-change access to this object. Continue?”
The state of the archive on the metadata should be “Current”.
Step 2.3 – Edit an existing Archive
I. In the Browse window, on your Home Screen, open the “3. Masterdata Views”
II. Select “Archives” and then choose the archive that you wish to edit. The metadata card will appear on the right side of the screen.
III. As a Metadata Administrator you should have Edit access to all fields. Click on the value you wish to change and edit it.
IV. Click on Save after editing.
Step 2.4 – Make an Archive “Not Current”
When an archive is no longer needed or no longer active, the metadata administrator can place the archive on “Not Current – Archive” state.
I. In the Browse window, on your Home Screen, open the “3. Masterdata Views” view
II. Select “Archives” and then choose the specific archive that you wish to place on “Not Current – Archive”
III. On the left side of the screen, under State Transition, click on “Not Current – Archive”

When the archive is no longer current, all documents associated with it will still be active and visible to users. If you update these documents or create a new one, an active archive should be selected.
Note: Records placed on “Not Current – Archive” will not be added to an archive, but will become obsolete. You will find an “Archived” view on most record types.
E.g. In case of documents, you can find All Documents on state “Not Current – Archive” by navigating to the All Documents view, and choosing “All Archived & Retired Documents”.

Section 3: Custom Fields
Custom Fields provide you with a powerful tool to tailor and organize data according to your organization’s specific needs. It provides a high degree of flexibility in defining information captured on metadata cards. The Metadata Admin can customize the settings. This feature is optional and will not impact any metadata cards if not enabled.
Step 3.1 – Enabling Custom Field Configurations
To get started with configuring custom fields, navigate to Masterdata Views> Custom Fields> Custom Field Configurations> All Custom Field Configurations
I. Open the configuration that matches the class for which you wish to set up custom fields.
II. Under State Transition click on Draft Configuration

III. The metadata card will become editable. Fill in the metadata card with the desired outcome for the selected target class.
Part 1: General Information
| Field name | Description | Note |
| Class* | Set by default to Custom Field. | |
| Target Class* | Set by default to the target class this configuration will be applied for. | |
| Responsible Person | If you wish to delegate the configuration to any user in the system, you can do so by naming a responsible person. This person will get access to the configuration and can make changes just like the Metadata Administrator. | The user must be a part of the All Contributors user group and have a Named or Concurrent license. |
IV. By default all unused configurations are collapsed on the metadata card. Click on the arrow beside the field you would like to configure to begin editing.

V. The following descriptions are also available in the system if you hover over the fields to show tooltips.

Part 2: Custom Fields
| Field name | Description | Note |
| Name | The entered name will be shown on the metadata card as the property label. Use a clear and concise name that reflects the purpose or desired content. | |
| Custom Field 1-5 (Value Lists) Configuration | Enabled: When activated, then property becomes visible on the metadata card of the target class under the Custom Properties section. Required: When activated, the property becomes mandatory on the target class and must be filled at creation or before saving Single Select: By default, the Value List Fields are Multiselect, so when the dropdown is in use it allows the selection of more than one value. By activating this setting, the value list will be limited to only allow one option on the resulting dropdown | |
| Custom Field 6-9 (Number) Configuration | Enabled: When activated, then property becomes visible on the metadata card of the target class under the Custom Properties section. Required: When activated, the property becomes mandatory on the target class and must be filled at creation or before saving | |
| Custom Field 10-11 (Date) Configuration | Enabled: When activated, then property becomes visible on the metadata card of the target class under the Custom Properties section. Required: When activated, the property becomes mandatory on the target class and must be filled at creation or before saving | |
| Custom Field 12-15 (Text) Configuration | Enabled: When activated, then property becomes visible on the metadata card of the target class under the Custom Properties section. Required: When activated, the property becomes mandatory on the target class and must be filled at creation or before saving Short Text: By default, the Text Fields are Long Text, allowing up to 10,000 characters in a paragraph style with multiple lines. By activating this setting, the text length will be limited to 100 characters in a single line. |
VI. Once the configuration is completed, click Save on the bottom right corner of the metadata card.
VII. To activate the configuration click on Activate Configuration under State Transition

VIII. After the activation is completed and the configuration reaches the Active Configuration state the newly enabled custom fields will be available on the Target Class’s metadata
Note: Custom fields have no impact on workflow processing or permissions.
Step 3.2 – Using Custom Fields
Once custom fields are configured and activated, they integrate into the standard metadata card in a section called “Custom Fields”. Here they can be used as standard metadata and filled according to your specific needs:

Fields will be editable based on the permissions of the target object. For example, if you have enabled custom fields for Suppliers these can be utilized by users in the Purchasing User Group and any mentioned Responsible Persons on the Supplier metadata card.
Any object created before the configuration of Custom Fields will also inherit the new configuration. Consequently, when these objects are updated, any fields marked as mandatory will also become mandatory for preexisting data.
Note: If Custom Fields are applied to any Document class, they can be utilized in Office documents similarly to existing fields. To locate the data in the Insert Property window, search for Custom Fields 1-15, which correspond to the configured Field on the metadata. To identify the source Custom Field, hover over the field in the metadata:

Step 3.3 – Changing or Emptying Custom Field Configurations
SimplerQMS strongly advises against emptying configurations or reusing Custom Fields that have been previously used to avoid data confusion. Exercise caution when disabling previously enabled custom properties on records.
Disabling a custom field or fully emptying the configuration will not remove the applied data within it on the target objects, and these historical data entries may introduce confusion as they may no longer align with the current context. It is advisable to thoroughly clean out any data if the field is to be reused in the future.
Before making any changes to already used Custom Values, it is recommended to navigate to Masterdata Views > Custom Fields > Objects with Content in Custom Fields > Custom Field you wish to deactivate or reuse. Here, you can evaluate the potential impact of the data changes on your current data captures and initiate any necessary cleanup.
Once thorough analysis has been completed regarding the impact of any Custom Field changes, you can proceed with initiating the changes.
Changes can be made at the individual field level, offering flexibility in customization. Additionally, there is an option available to completely empty a configuration if the use of Custom Fields needs to be discontinued for a specific Target Class.
I. Navigate to the configuration you wish to empty
II. If not in draft, set it to the Draft Configuration state
III. Click on Empty Configuration
a. An electronic signature will be required

IV. After emptying the configuration, click on Activate Configuration for the changes to be applied

Step 3.4 – Creating Custom Value Lists
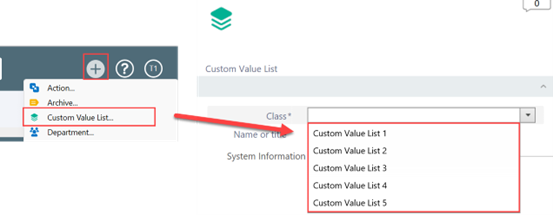
When Custom Fields 1-5 are enabled, Custom Value Lists must be created for their utilization. This process can be initiated either by clicking the Create (+) button or directly on a metadata card using the Add Value [+] button when the field is in use. Only the Metadata Administrator is able to initiate new Custom Value Lists.
The Create button is particularly beneficial when you intend to set up a comprehensive value list immediately after configuring the Custom Fields. The option to create while in use is helpful in minimizing potential errors, as it enables the creation of values tailored specifically to the value list where the newly created value will be used.
Option 1: Create Button
I. Using the Create button will require you to specify which class you are creating a value list for which should correspond to the Custom Value where you wish to initiate the dropdown options:
II. Fill in the rest of the metadata card
Option 2: Add Field on Target Class Metadata Card
I. When initiating a new value within an active value list, the creation metadata card will automatically select the appropriate Class for where the value will be used

II. Fill in the rest of the metadata card
Part 1: General Information
| Field name | Description | Note |
| Value Name* | The entered name will be shown as the value on the dropdown. Use a clear and concise name that reflects the desired content. | |
| Target Class(es)* | Specify the specific class or classes where the assigned value should be visible. When defining multiple target classes, it means creating a shared value that can be accessed across all of them within the same Custom Value. | The availability of a value is determined by the combination of both its Class and Target Classes |
| Responsible Person | If you wish to delegate the management of the value to any user in the system, you can do so by naming a responsible person. This person will get access to retire this value and can make changes just like the Metadata Administrator. | The user must be a part of the All Contributors user group and have a Named or Concurrent license |
| Description | Add an optional description for the value |
Values created will be available in the dropdown for selection:

Step 3.5 – Managing Custom Values
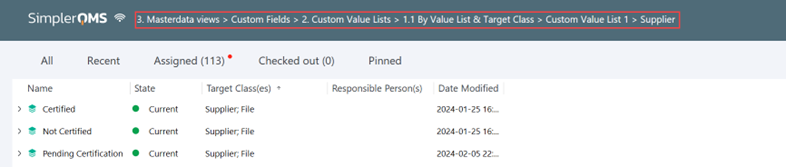
Metadata Administrators and assigned Responsible Persons have full control over the values created for each Custom Value List. To gain an overview of all custom values for created for a specific Custom Field and Target Class navigate to Masterdata Views> Custom Fields> Custom Value Lists > By Value List & Target Class.
Note: Delegation of value management to the person in charge of Custom Value List is an option, since the Metadata Administrator can initiate multiple placeholder values, allowing the selected responsible person to later modify them.
Currently unused values can be set to Not Current which will exclude them as selectable options on the dropdown. When a value is disabled, it will not be removed from metadata cards where it has already been in use.

Previously disabled values can be reinstated by setting the to Current again:

Section 4: Managing Departments
The department in SimplerQMS is defined as the departments in your organizational chart. The documents that will be implemented in the system should define the department that it belongs to.
Step 4.1 – Create a New Department
There are multiple ways to create a Process in SimplerQMS:
I. In the Create New section, on your Home Tab, click on Department.

II. Click on the Create (+) next to the Home Tab and choose Department from the dropdown list
III. On the left side of the screen, expand Create and click on Department
A Metadata Card will pop up.
Step 4.2 – Fill out metadata
Part 1: General Information
| Field name | Description | Note |
| Class* | Set by default to Department. | |
| Name or title* | Type in the name of the department. | |
| Managers* | Select the manager of the department based on your organizational chart. This does not give additional access rights to the user selected. | |
| Owning Department | Select the owning department (if necessary) if this is a department belongs under anotherSelect the RP of the archive. This does not give additional access rights to the user selected. | |
| Description | Type in a description about the department if necessary. |
I. Click Create after filling out all necessary information on the metadata card.
II. Click OK when you see the following box: “With the selected permissions, you will not have permission-change access to this object. Continue?”
The state of the department on the metadata should be “Current”.
Step 4.3 – Edit an existing Department
I. In the Browse window, on your Home Screen, open the “3. Masterdata Views”
II. Select “Departments” and then choose the department that you wish to edit. The metadata card will appear on the right side of the screen.
III. As a Metadata Administrator you should have Edit access to all fields. Click on the value you wish to change and edit it.
IV. Click on Save after editing.
Step 4.4 – Make a Department “Not Current”
When a department is no longer needed or no longer active, the metadata administrator can place the department on “Not Current – Archive” state.
I. In the Browse window, on your Home Screen, open the “3. Masterdata Views” view
II. Select “Departments” and then choose the specific department that you wish to place on “Not Current – Archive”
III. On the left side of the screen, under State Transition, click on “Not Current – Archive”

When the department is no longer current, all documents associated with it will still be active and visible to users. If you update these documents or create a new one, an active department should be selected.
Section 5: Managing Document Types
Document Types have multiple functions in SimplerQMS; therefore they play a very important role in the management of your system:
1. The document type you choose on a document metadata will be part of the name that the system generates alongside the unique ID and the Short Title that you specify.

2. You can filter documents based on Document Types. If you navigate to the “All Documents” view, you will see that “By Document Type” is an option you can choose (along with other combinations). This will give you adequate filtering based on Document Types associated with specific documents

3. Based on what settings you set on a specific document type, 3 important properties will be controlled on documents that you will be assigning it to.
- Document Type – Classified
- If you set this value to Yes, it will carry over to the document you will use it on, and all documents that will be running on this document type will have limited access permissions to users who are specifically given access to the document type.
- This is the highest restriction level you can have on documents, meaning that unless permission is given, users will not see documents running on this document type. An exception is if the person is related to the document through the Relations field.
- To give access to a Classified Document Type, the metadata administrator has to open a person’s record in the system. Navigate to the “Employee Access Rights to Released Documents” and the “Employee Access Rights to Working Copy Documents” and define which Classified Document Types the user should have access to by inputting them in the fields “Document type classified” and “Classified Doctype Editor”.

- Document Requires Change Request
- This value will control if your document will or will not require Change Request before processing. To read more, refer to Work Instruction: Managing Quality Documents.
- Document Requires Periodic review
- This value will control if the documents you create on this document type will automatically have a periodic review generated after creation or not. To understand more about periodic reviews, refer to Work Instruction: Actions, Periodic Tasks and Reminder Rules.
- Requires Controlled Printing
- This value will control if the resulting documents will be blocked from printing without using the controlled printing feature. This value is only editable if the global settings for controlled printing are enabled for Quality Documents. Refer to WI: Controlled Printing to learn more.
- For enabling or disabling Controlled Printing settings, reach out to the SimplerQMS team.
- To have a full overview of all your document type settings, navigate to the document type views: 3. Masterdata Views — Document Types

Step 5.1 – Create a New Document Type
There are multiple ways to create a Document Type in SimplerQMS:
I. In the Create New section, on your Home Tab, click on Document Type

II. Click on the Create (+) next to the Home Tab and choose Document Type from the dropdown list.
III. On the left side of the screen, expand Create and click on Document Type.
A Metadata Card will pop up.
Step 5.2 – Fill out metadata
Part 1: General Information
| Field name | Description | Note |
| Class* | Set to default to Document Type. | |
| Responsible Person* | Type in the name of the document type. | |
| Document Type is Classified* | Select Yes or No to define if the document type is for classified documents or not. | |
| Requires Change Request* | Select Yes or No to define if the document type will require a change request for the document when selected. | |
| Requires Periodic Review* | Select Yes or No to define if the document type will require a periodic review for the document when selected. | |
| Requires Controlled Printing* | Set to Disabled by default if the controlled printing module is disabled. Select Enabled or Disabled to control if documents under the document type should be blocked from printing or not. | Refer to WI: Controlled Printing |
| Description | Type in a description about the document type if necessary. |
I. Click Create after filling out all necessary information in the meta data card.
II. Click OK when you see the following box: “With the selected permissions, you will not have permission-change access to this object. Continue?”
The state of the document type on the metadata should be “Current Document Type”.
Step 5.3 – Update an existing Document Type
I. In the Browse window, on your Home Screen, open the “3. Masterdata Views”. Select “Document Types” and then choose the document type that you wish to edit.
II. As a Metadata Administrator you will have the option “Update Document Type” under State Transition on the left side.

III. The metadata card on the right side of the screen will become editable and you can carry out the changes you wish. Click on Save after editing.
IV. To enable the settings, click on “Enable and Approve Settings” button under State Transition.

Step 5.4 – Make a Document Type “Not Current”
When a document type is no longer needed or no longer active, the metadata administrator can place it on “Not Current – Archive” state.
I. In the Browse window, on your Home Screen, open the “3. Masterdata Views” view
II. Select “Document Types” and then choose the specific document type that you wish to place on “Not Current – Archive”
III. On the left side of the screen, under State Transition, click on “Not Current – Archive”

When the document type is no longer current, all documents associated with it will still be active and visible to users. If you update these documents or create a new one, an active document type should be selected.
Section 6: Managing Persons – Human Resources
The Persons metadata-value is used for providing ownership and access rights of documents and records to specific persons/employees.
Persons can ONLY be created in the Active Directory and thereafter synchronized to M-Files, where they can be managed with other necessary details.
Step 6.1 – Update an existing Person record
When editing any information in the metadata of a person, only the users with the Human Resources user group can make changes. They can edit employee access rights to released and working copy documents as well as edit the employee’s information card – most importantly assign or remove job roles used for setting up learning rules.
I. In the Browse window, on your Home Screen, open the “3. Masterdata Views”
II. Select “Person views”, then the right category you are looking for (e.g., Persons – All) and then choose the person record that you wish to edit. The metadata card of will appear on the right side of the screen.
III. Edit the right fields:
Part 1: Employee Information
| Field name | Description | Note |
| Class | Set by default to Employee. | |
| License Type | License type is automatically generated from the assigned license to the employee/user. | |
| First name | First name of the employee. | |
| Last name | Last name of the employee. | |
| Job title | The employees job title. | |
| Training Group | Training Group is the assigned group to a certain user and is used for assigning training records. | For further details, you refer to WI: Training & Learning |
| Supervisor | Employee’s supervisor’s name. A user that is also active in the system. | |
| Other Contact Info | Other details needed can be placed here. | |
| Phone | Add information if necessary. | |
| Fax | Add information if necessary. | |
| Address Street Name | Add information if necessary. | |
| Address Postal Code | Add information if necessary. | |
| Address City | Add information if necessary. | |
| Country | Adding the country is advisable, by doing so, it could refresh the synchronization of the Azure directory information to M-files. |
Part 2: User groups (System-wide Roles)
| Field name | Description | Note |
| User groups | List of user groups assigned to the employee from the Azure Directory. | This section is not editable as it synchronizes with the information from the directory. |
Part 3: Employee Access Rights to Released Documents
| Field name | Description | Note |
| Document type classified | The dropdown lists all the document types that have been classified. 1st Access Restriction Priority: User will have access to any current and future document related to this classified document type. | For further information, refer to Section 5 |
| Projects | The dropdown lists all the projects that have been created in the system. 2nd Access Restriction Priority: User will have access to any current and future documents related to this project. It requires that a document is not in scope for Priority 1. | For further information, refer to Section 8 |
| Site(s) | (Mandatory) – to give full access to all released documents The dropdown lists all the sites that have been created in the system. 3rd Access Restriction Priority: User will have access to any current and future document related to this site. Requires that a document is not in scope for Priority 1 or 2. | For further information, refer to Section 9 |
| Department | The drop down lists all the departments that have been created in the system. 3rd Access Restriction Priority: User will have access to any current and future document related to this department. Requires that a document is not in scope for Priority 1 or 2. | For further information, refer to Section 4 |
Part 4: Employee Access Rights to Working Copy Documents
| Field name | Description | Note |
| Classified Doctype Editor | The dropdown lists all the document types that have been classified. 1st Access Restriction Priority: User will have access to any current and future document related to this classified document type. | For further information, refer to Section 5 |
| Project Editor | The dropdown lists all the projects that have been created in the system. 2nd Access Restriction Priority: User will have access to any current and future documents related to this project. It requires that a document is not in scope for Priority 1. | For further information, refer to Section 8 |
| Department Editor | The drop down lists all the departments that have been created in the system. 3rd Access Restriction Priority: User will have access to any current and future document related to this department. Requires that a document is not in scope for Priority 1 or 2. | For further information, refer to Section 4 |
| Site Editor | (Mandatory) – to give full access to all working copy documents The dropdown lists all the sites that have been created in the system. 3rd Access Restriction Priority: User will have access to any current and future document related to this site. Requires that a document is not in scope for Priority 1 or 2. | For further information, refer to Section 9 |
Click on Save after adding or editing the employee’s information.
Step 6.2 – Change Person’s status
The default status of a user once created in Azure Directory is Current. When an employee’s status is on Current and needed to be changed, a user within the Human Resources user group can perform this task.
Reasons to change a person’s status from Current:
- When the person is not currently available or in a long leave of absence
- When the person is currently unavailable and not able to acknowledge/sign training records
- When the person is no longer part of the company
I. In the Browse window, on your Home Screen, open the “3. Masterdata Views”
II. Select “Person views”, then the right category you are looking for (e.g. Persons – All) and then choose the person record that you wish to edit.
III. Under State Transition, click on either “Former Employee” or “Unavailable”.

Former Employee – When an employee has been changed to a former employee, this could mean that the user is also deleted from the Azure Directory. If you prefer to keep all user/employee records even if they are no longer part of the company, you can keep them as former employee and no further actions will apply for them.
Unavailable – When an employee has been changed to unavailable, the user can still be active in the system however, no training records will be assigned for them. When the user is back, switch the user back to current so that the training records will start assigning with the correct start date.
Former and Unavailable Users will not be available for any role assignments on future documents until made Current again.
Section 7: Managing Processes
Processes are based on a list that your organization defines based on the standards you follow. All documents created within the system should have a process assigned to them.
When you create a process, the assigned Process Manager will have additional permission on all records created in the system:
- A process manager has the right to implement a template without a change request. Refer to Work Instruction: Managing Templates
- When a released document is on “For Learning” state, the process manager can make the document effective immediately
- When a released document is on “For Learning” state, the process manager can cancel the released version
- When a document is on “Review Ongoing” state, the process manager can modify the reviewer’s list or close the review immediately
- When a document that does not require a change request is released and effective, the process manager can route the document for updates or set a retire date. Refer to Work Instruction: Managing Quality Documents
Step 7.1 – Create a New Process
There are multiple ways to create a Process in SimplerQMS:
I. In the Create New section, on your Home Tab, click on Process

II. Click on the Create (+) next to the Home Tab and choose Process from the dropdown list.
III. On the left side of the screen, expand Create and click on Process.
A Metadata Card will pop up.
Step 7.2 – Fill out metadata
Part 1: General Information
| Field name | Description | Note |
| Class* | Set by default to Main Process. | |
| Name or title* | Type in the name of the process. | |
| Managers* | Select the process manager who manages the process. | Keep in mind that this person will have additional permissions systemwide |
| Description | Type in a description about the process if necessary. | |
| Owning Main Process | Select a parent process (if necessary). |
I. Click Create after filling out all necessary information in the metadata card.
II. Click OK when you see the following box: “With the selected permissions, you will not have permission-change access to this object. Continue?”
The state of the process on the metadata should be “Current”.
Step 7.3 – Edit an existing Process
I. In the Browse window, on your Home Screen, open the “3. Masterdata Views”
II. Select “Processes” and then choose the process that you wish to edit. The metadata card will appear on the right side of the screen.
III. As a Metadata Administrator you should have Edit access to all fields. Click on the value you wish to change and edit it.
IV. Click on Save after editing.
Step 7.4 – Make a Process “Not Current”
When a process is no longer needed or no longer active, the metadata administrator can place the process on “Not Current – Archive” state.
I. In the Browse window, on your Home Screen, open the “3. Masterdata Views” view
II. Select “Processes” and then choose the specific process that you wish to place on “Not Current – Archive”
III. On the left side of the screen, under State Transition, click on “Not Current – Archive”

When the process is no longer current, all documents associated with it will still be active and visible to users. If you update these documents or create a new one, an active process should be selected.
Section 8: Managing Projects
Projects in SimplerQMS provide document management mainly for design and development. It helps to further filter in archives for technical documentation.
Project documentation can only be viewed by users who have been given access to the project by the metadata administrator. To give access to a Project, the metadata administrator
I. Opens a person’s record in the system
II. Navigate to the “Employee Access Rights to Released Documents” and the “Employee Access Rights to Working Copy Documents”.
III. Adds the applicable project(s) in the fields “Projects” and “Project Editor”.

For detailed instructions and more information, refer to Work Instruction: Managing Projects and Archives
Step 8.1 – Create a New Project
There are multiple ways to create a Project in SimplerQMS:
I. In the Create New section, on your Home Tab, click on Project

II. Click on the Create (+) next to the Home Tab and choose Project from the dropdown list
III. On the left side of the screen, expand Create and click on Project
A Metadata Card will pop up.
Step 8.2 – Fill out metadata
Part 1: General Information
| Field name | Description | Note |
| Class* | Set by default to Project. | |
| Owning Project | Select the parent project if there is any. | |
| Name or title* | Type in the name of the project. | |
| Site(s)* | Select the site the project belongs to. | |
| Responsible Person* | Select the RP of the Project. This does not give additional access rights to the user selected. | |
| Description* | Type in a description about the project. |
I. Click Create after filling out all necessary information in the meta data card.
II. Click OK when you see the following box: “With the selected permissions, you will not have permission-change access to this object. Continue?”
The state of the Project on the metadata should be “Current”.
Step 8.3 – Edit an existing Project
I. In the Browse window, on your Home Screen, open the “3. Masterdata Views”
II. Select “Projects” and then choose the project that you wish to edit. The metadata card will appear on the right side of the screen.
III. As a Metadata Administrator you should have Edit access to all fields. Click on the value you wish to change and edit it.
IV. Click on Save after editing.
Step 8.4 – Make a Project “Not Current”
When a project is no longer needed or no longer active, the metadata administrator can place the project on “Not Current – Archive” state.
I. In the Browse window, on your Home Screen, open the “3. Masterdata Views” view
II. Select “Projects” and then choose the specific process that you wish to place on “Not Current – Archive”
III. On the left side of the screen, under State Transition, click on “Not Current – Archive”

When the project is no longer current, all documents associated with it will still be active and visible to users. If you update these documents or create a new one, an active project should be selected.
Section 9: Recorded Issue Types
Recorded Issue types are editable by the Metadata Administrator and changes will impact the workflow you experience when using them.

For more information on how to work with Recorded Issues, refer to WI: Recorded Issues and CAPAs
Step 9.1 – Changing Recorded Issue Type Settings
On the metadata card of the Recorded Issue Type, the following fields are present:
Part 1: General Information
| Field name | Description | Note |
| Class* | Set by default to Recorded Issue Type. | |
| Name or title* | New display name that you can define. This will not change the RI Type, but the name that the recorded issue is displayed in will be changed. | |
| Reportable* | Choosing Yes on this field will mean that every time the respective recorded issue type is used, the resulting document will need to go through assessment for Vigilance Reporting. You still have the chance to choose that the individual record did not need to be reported on, but the steps will have to be taken to ensure appropriate measures were considered. (Replacing the MDR Reporting step previously on NC and Complaints) | For more information, refer to WI: Recorded Issues and CAPAs |
| RI Type* | Set to default value pointing to the workflow the item will initiate. This value will be used by the system to identify the type of RI you are to create in its workflow. |
To change a setting:
I. Click on the Recorded Issue Type you wish to change
II. Edit the field in the metadata card.
Note: Changing the “Name or Title” field will only modify the recorded issue type’s display name. You will need to reach out to SimplerQMS if you have finalized your changes, so the correct names can be set on Views as well.
Example:
Recorded Issue Type Nonconformance is renamed to Deviation:

The result of the change is that the Recorded Issue Types list on the resulting document will display the newly set name.

Section 10: Managing Sites
The site in SimplerQMS is defined as the legal entity of your organization. This is the primary level of access that you can provide to a user to ensure that all released and working copy documents are viewable, accessible, and editable.
If you add a new user and they do not see any records in the system, you should always first verify if the Site has been assigned to the new person record. Changes to these fields can be done by the metadata administrator:
I. Open a person’s record in the system
II. Navigate to the “Employee Access Rights to Released Documents” and the “Employee Access Rights to Working Copy Documents”.
III. Add the applicable project(s) in the fields “Site(s)” and “Site Editor”.

It is recommended to keep your documents to one site to begin with, but there could be more than one site in an organization, if necessary. The best option is for the metadata administrator to ensure that correct sites are assigned to the users. If you would like to keep people to one site only, you need to make sure that you add multiple sites in the metadata of records if they are intended to be shared between sites.
Step 10.1 – Create a New Site
There are multiple ways to create a Site in SimplerQMS:
I. In the Create New section, on your Home Tab, click on Site

I. Click on the Create (+) next to the Home Tab and choose Site from the dropdown list
II. On the left side of the screen, expand Create and click on Site
A Metadata Card will pop up.
Step 10.2 – Fill out metadata
Part 1: General Information
| Field name | Description | Note |
| Name or title* | Legal name of the company or the location of the site. | |
| Managers* | Select a user with the Metadata Administrator user group or the user who manages the actual site. | |
| Address | Automatically generated by the system after filling out the below address information | |
| Address Street Name | Address of the organization or of the selected site | |
| Address Postal Code | Address of the organization or of the selected site | |
| Address City | Address of the organization or of the selected site | |
| Country | Address of the organization or of the selected site | |
| Description | Describe the information about the site if necessary |
I. Click Create after filling out all necessary information in the meta data card.
II. Click OK when you see the following box: “With the selected permissions, you will not have permission-change access to this object. Continue?”
The state of the site on the metadata should be “Current”.
Step 10.3 – Edit an existing Site
I. In the Browse window, on your Home Screen, open the “3. Masterdata Views”
II. Select “Sites” and then choose the site that you wish to edit. The metadata card will appear on the right side of the screen.
III. As a Metadata Administrator you should have Edit access to all fields. Click on the value you wish to change and edit it.
IV. Click on Save after editing.
Step 10.4 – Make a Site “Not Current”
I. In the Browse window, on your Home Screen, open the “3. Masterdata Views” view
II. Select “Sites” and then choose the specific site that you wish to place on “Not Current – Archive”
III. On the left side of the screen, under State Transition, click on “Not Current – Archive”

When the site is no longer current, all documents associated with it will still be active and visible to users. If you update these documents or create a new one, an active site should be selected.
Section 11: Managing Standards and Standard Chapters
By default, SimplerQMS is equipped with the ISO 13485:2016 Standards and all relevant standard chapters. To create your own list, follow the steps in this section.
Standards and Standard Chapters can be used as a basis for navigation of your QMS system, by relating Standard Chapters to records through the Relations field:

When standard chapters get assigned to standards, a virtual folder will be created with the name of the standards that will contain all associated standard chapters. To access these, click on the “3. Masterdata views”, then “Standards” and choose the standard you wish to open. A list of standard chapters will appear.
To view all related records to a standard chapter, click the standard chapter, then on the left side under View Extensions, click on “Show Detail Listings”:

Step 11.1 – Create a New Standard or Standard Chapter
There are multiple ways to create Standards/ Standard Chapters in SimplerQMS:
I. In the Create New section, on your Home Tab, click on Standard.

I. Click on the Create (+) next to the Home Tab and choose Standard from the dropdown list
II. On the left side of the screen, expand Create and click on Standard
A Metadata Card will pop up.
Step 11.2 – Fill out metadata
Option 1: Standard
Part 1: General Information
| Field name | Description | Note |
| Class* | Select Standard. | |
| Short title* | Type in the name / number sequence of the standard – this will travel over to the name of the virtual folder as well. | |
| Responsible Person* | Select the RP of the standard. This does not give additional access rights to the user selected. | |
| Description | Type in a description about the standard if necessary. |
I. Click Create after filling out all necessary information on the metadata card.
The state of the standard on the metadata should be “Current”.
Option 2: Standard Chapter
Part 1: General Information
| Field name | Description | Note |
| Class* | Select Standard Chapter. | |
| Short title* | Add both the section reference and the title of the standard chapter. | |
| Standard* | Select the RP of the standard chapter. This does not give additional access rights to the user selected. | |
| Description | Type in a description about the standard chapter if necessary. |
I. Click Create after filling out all necessary information on the metadata card.
The state of the standard chapter on the metadata should be “Current”.
Step 11.3 – Edit an existing Standard / Standard Chapter
I. In the Browse window, on your Home Screen, open the “3. Masterdata Views”
II. Select “Standards” and open the relevant virtual folder.
III. Choose the standard or standard chapter that you wish to edit. The metadata card will appear on the right side of the screen.
IV. As a Metadata Administrator you should have Edit access to all fields. Click on the value you wish to change and edit it.
V. Click on Save after editing.
Step 11.4 – Make a Standard / Standard Chapter “Not Current”
When a Standard / Standard Chapter is no longer needed or no longer active, the metadata administrator can place the archive on “Not Current – Archive” state.
I. In the Browse window, on your Home Screen, open the “3. Masterdata Views” view
II. Select “Standards” and open the relevant virtual folder.
III. Choose the standard or standard chapter that you wish to place on “Not Current – Archive”
IV. On the left side of the screen, under State Transition, click on “Not Current – Archive”

When the standard chapter is no longer current, all documents associated with it will still be active and visible to users. If you update these documents or create a new one, an active archive should be selected.
When a standard is no longer current, the created virtual folder will also disappear – if there are no standard chapters assigned to it.