Purpose
Learn how to:
- Manage Custom Field Configurations
- Use Custom Fields
- Create and Manage Custom Values
Expected Outcome
- Users are equipped to handle Custom Fields
Prerequisites for all
- Must be logged in to SimplerQMS
- Must be a member of one of these ‘User Groups’
- Metadata administrator
Overview
Custom Fields provide you with a powerful tool to tailor and organize data according to your organization’s specific needs. It provides a high degree of flexibility in defining information captured on metadata cards. The Metadata Admin can customize the settings. This feature is optional and will not impact any metadata cards if not enabled.
To access it:
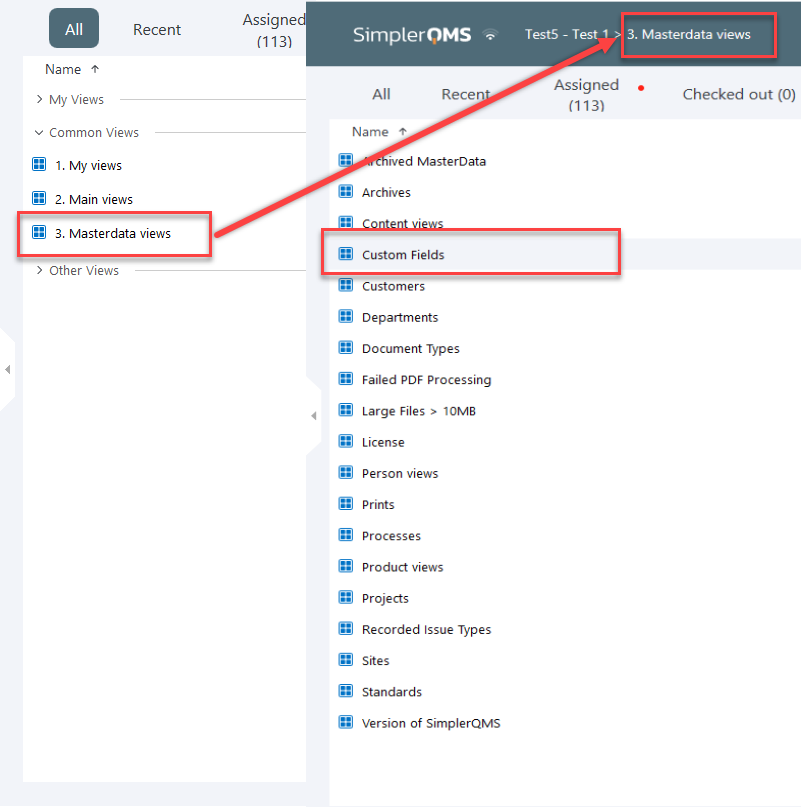
- On the Home screen, under Browse, double click on “3. Masterdata views”
- Within this view, you will be able to see all sub views that will help you navigate metadata
- Click Custom Fields
Step 1 – Enabling Custom Field Configurations
To get started with configuring custom fields, navigate to Masterdata Views> Custom Fields> Custom Field Configurations> All Custom Field Configurations
I. Open the configuration that matches the class for which you wish to set up custom fields.
II. Under State Transition click on Draft Configuration

III. The metadata card will become editable. Fill in the metadata card with the desired outcome for the selected target class.
Part 1: General Information
| Field name | Description | Note |
| Class* | Set by default to Custom Field. | |
| Target Class* | Set by default to the target class this configuration will be applied for. | |
| Responsible Person | If you wish to delegate the configuration to any user in the system, you can do so by naming a responsible person. This person will get access to the configuration and can make changes just like the Metadata Administrator. | The user must be a part of the All Contributors user group and have a Named or Concurrent license. |
IV. By default all unused configurations are collapsed on the metadata card. Click on the arrow beside the field you would like to configure to begin editing.

V. The following descriptions are also available in the system if you hover over the fields to show tooltips.

Part 2: Custom Fields
| Field name | Description | Note |
| Name | The entered name will be shown on the metadata card as the property label. Use a clear and concise name that reflects the purpose or desired content. | |
| Custom Field 1-5 (Value Lists) Configuration | Enabled: When activated, then property becomes visible on the metadata card of the target class under the Custom Properties section. Required: When activated, the property becomes mandatory on the target class and must be filled at creation or before saving Single Select: By default, the Value List Fields are Multiselect, so when the dropdown is in use it allows the selection of more than one value. By activating this setting, the value list will be limited to only allow one option on the resulting dropdown | |
| Custom Field 6-9 (Number) Configuration | Enabled: When activated, then property becomes visible on the metadata card of the target class under the Custom Properties section. Required: When activated, the property becomes mandatory on the target class and must be filled at creation or before saving | |
| Custom Field 10-11 (Date) Configuration | Enabled: When activated, then property becomes visible on the metadata card of the target class under the Custom Properties section. Required: When activated, the property becomes mandatory on the target class and must be filled at creation or before saving | |
| Custom Field 12-15 (Text) Configuration | Enabled: When activated, then property becomes visible on the metadata card of the target class under the Custom Properties section. Required: When activated, the property becomes mandatory on the target class and must be filled at creation or before saving Short Text: By default, the Text Fields are Long Text, allowing up to 10,000 characters in a paragraph style with multiple lines. By activating this setting, the text length will be limited to 100 characters in a single line. |
I. Once the configuration is completed, click Save on the bottom right corner of the metadata card.
VII. To activate the configuration click on Activate Configuration under State Transition

VIII. After the activation is completed and the configuration reaches the Active Configuration state the newly enabled custom fields will be available on the Target Class’s metadata
Note: Custom fields have no impact on workflow processing or permissions.
Step 2 – Using Custom Fields
Once custom fields are configured and activated, they integrate into the standard metadata card in a section called “Custom Fields”. Here they can be used as standard metadata and filled according to your specific needs:

Fields will be editable based on the permissions of the target object. For example, if you have enabled custom fields for Suppliers these can be utilized by users in the Purchasing User Group and any mentioned Responsible Persons on the Supplier metadata card.
Any object created before the configuration of Custom Fields will also inherit the new configuration. Consequently, when these objects are updated, any fields marked as mandatory will also become mandatory for preexisting data.
Note: If Custom Fields are applied to any Document class, they can be utilized in Office documents similarly to existing fields. To locate the data in the Insert Property window, search for Custom Fields 1-15, which correspond to the configured Field on the metadata. To identify the source Custom Field, hover over the field in the metadata:

Step 3 – Changing or Emptying Custom Field Configurations
SimplerQMS strongly advises against emptying configurations or reusing Custom Fields that have been previously used to avoid data confusion. Exercise caution when disabling previously enabled custom properties on records.
Disabling a custom field or fully emptying the configuration will not remove the applied data within it on the target objects, and these historical data entries may introduce confusion as they may no longer align with the current context. It is advisable to thoroughly clean out any data if the field is to be reused in the future.
Before making any changes to already used Custom Values, it is recommended to navigate to Masterdata Views > Custom Fields > Objects with Content in Custom Fields > Custom Field you wish to deactivate or reuse. Here, you can evaluate the potential impact of the data changes on your current data captures and initiate any necessary cleanup.
Once thorough analysis has been completed regarding the impact of any Custom Field changes, you can proceed with initiating the changes.
Changes can be made at the individual field level, offering flexibility in customization. Additionally, there is an option available to completely empty a configuration if the use of Custom Fields needs to be discontinued for a specific Target Class.
I. Navigate to the configuration you wish to empty
II. If not in draft, set it to the Draft Configuration state
III. Click on Empty Configuration
a. An electronic signature will be required

IV. After emptying the configuration, click on Activate Configuration for the changes to be applied

Step 4 – Creating custom Value Lists
When Custom Fields 1-5 are enabled, Custom Value Lists must be created for their utilization. This process can be initiated either by clicking the Create (+) button or directly on a metadata card using the Add Value [+] button when the field is in use. Only the Metadata Administrator is able to initiate new Custom Value Lists.
The Create button is particularly beneficial when you intend to set up a comprehensive value list immediately after configuring the Custom Fields. The option to create while in use is helpful in minimizing potential errors, as it enables the creation of values tailored specifically to the value list where the newly created value will be used.
Option 1: Create Button
I. Using the Create button will require you to specify which class you are creating a value list for which should correspond to the Custom Value where you wish to initiate the dropdown options:
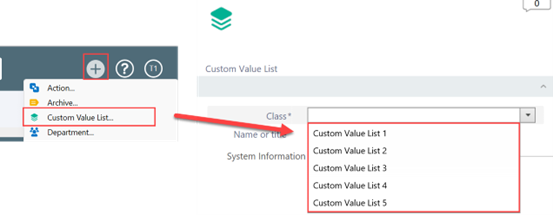
II. Fill in the rest of the metadata card
Option 2: Add Field on Target Class Metadata Card
I. When initiating a new value within an active value list, the creation metadata card will automatically select the appropriate Class for where the value will be used

II. Fill in the rest of the metadata card
Part 1: General Information
| Field name | Description | Note |
| Value Name* | The entered name will be shown as the value on the dropdown. Use a clear and concise name that reflects the desired content. | |
| Target Class(es)* | Specify the specific class or classes where the assigned value should be visible. When defining multiple target classes, it means creating a shared value that can be accessed across all of them within the same Custom Value. | The availability of a value is determined by the combination of both its Class and Target Classes |
| Responsible Person | If you wish to delegate the management of the value to any user in the system, you can do so by naming a responsible person. This person will get access to retire this value and can make changes just like the Metadata Administrator. | The user must be a part of the All Contributors user group and have a Named or Concurrent license |
| Description | Add an optional description for the value |
Values created will be available in the dropdown for selection:

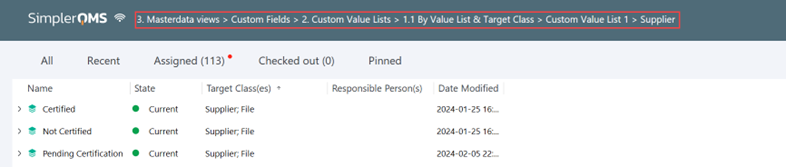
Step 5 – Managing Custom Values
Metadata Administrators and assigned Responsible Persons have full control over the values created for each Custom Value List. To gain an overview of all custom values for created for a specific Custom Field and Target Class navigate to Masterdata Views> Custom Fields> Custom Value Lists > By Value List & Target Class.
Note: Delegation of value management to the person in charge of Custom Value List is an option, since the Metadata Administrator can initiate multiple placeholder values, allowing the selected responsible person to later modify them.
Currently unused values can be set to Not Current which will exclude them as selectable options on the dropdown. When a value is disabled, it will not be removed from metadata cards where it has already been in use.

Previously disabled values can be reinstated by setting the to Current again:
