Purpose
Learn how to:
- Create Non-Quality Files in SimplerQMS
- Edit and Delete Files
- Manage settings and permissions on Files
- Locate Files
Expected Outcome
- Users are equipped to handle Non-Quality Files in SimplerQMS
Prerequisites for all
- Must be logged in to SimplerQMS
- Must be a member of one of these ‘User Groups’ to view records:
- All internal and external users
- Must be a member of one of these ‘User Groups’ to create new records
- All Contributors
Section 1: Class overview
The File class expands capabilities in SimplerQMS, offering a document management solution alongside the management of quality documents and records. Refer to the chart below for key differences between the main document management classes and how the File class fits into the current structure.

Section 2: Creating Files
The File class is intended to be used for managing various document types that are not considered quality records, such as sales documents, financial reports, research notes, emails, and more. Files are not turned into a PDF and do not get a unique ID assigned within the document title. Files also do not have a review and approval flow. They will simply be stored as you have uploaded them from an external source or created them based on a pre-approved template.
Step 1.1 – Create File
Step 2.1. Can be accomplished by a person who has the All Contributors User Group assigned to them.
Option 1: Create a File by Drafting from Template – Initiator
I. Click on Create (+) and choose Document from the dropdown list
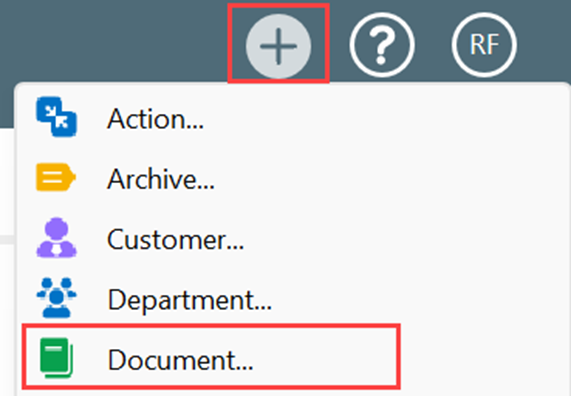
II. To create a File from this selection, you need Select Class as File
III. Select one of the approved templates for File.
A Metadata card will pop up. (Any prefilled metadata besides the Site and Responsible Person is based on the selected template)
Templates available for drafting a new File need to be handled according to the WI: Managing Templates and they have their own Review and Approval workflow.
Option 2: Create a File by Drag & Drop – Initiator
Another way of implementing a file is by dragging an existing file from your local drive into the system.
I. Select a file from your local drive.
II. Drag the file into “Checked Out to Me”.
III. A metadata card will pop up.
IV. Select “File” on the Class dropdown.
A Metadata Card will pop up. Short Title captures the original file name.
Part 1: File Information
| Field name | Description | Note |
| Class | Select File to create a file from a template or at drag and drop. | |
| Short Title | When creating from a template, the short title needs to be defined by the initiator. When drag and drop is used the original file title is captured. | |
| Site(s)* | Prefilled with the site(s) the initiator belongs to and can be edited. | |
| Document Type | Optional property used for navigation only. Does not get added to the document title. Classified Document Type access permissions are respected. | |
| Department | Define a department the file should belong to. Used for navigation. | |
| Process | Select a process that the file belongs to. | If a process is defined, Process Manager will also gain permissions to the File. |
| Archive | Define archives to include the files in your navigation structure (if archives are in use) | |
| Relation(s) | Define relations from the file to other files or other objects in the system. Project relations will result in permission restrictions. |
Part 2: Additional Information
| Field name | Description | Note |
| Responsible Person(s)* | Person responsible for the file. | Will not get the file assigned to them |
| Editable for All | By default, Yes is selected. This results in a file that can be edited by all users in the All Contributors User Group within your vault. Changing this field to No will result in an additional Author property being added to the metadata. | Refer to WI: Managing Change Request |
| – Author(s)* | If Editable for All setting is set to No, author(s) can be defined for the file. | Will not get the file assigned to them |
| Deletable for All | By default, No is selected. This results in a file that can only be deleted by the responsible person and any defined author. | Refer to WI: Managing Recorded Issues and CAPAs |
| Description | Provide any optional description needed for the file |
Once the metadata is completed, click Create.
NOTE: The resulting file will not be assigned to the Responsible Person(s) or the Author(s) if defined.
Section 3: Editing a file
Editing a file is initiated by checking the file out. You can make modifications to the file just like you would to any other document in SimplerQMS. However, the resulting File will never be turned into a PDF. You can do so manually and then replace the content of the file.
Step 3.1 – Editing a File
I. Double clicking on the file you wish to edit
II. Click Check Out when prompted
a. If you only wish to read the document, you can select Read Only mode to open.

III. Once checked out, you have sole ownership of the document while editing it. Changes made to the document are saved once it is checked back into SimplerQMS.
IV. To check in, save and close the document. When prompted, click on Check In.
Metadata changes can made at any point in the File’s lifetime by the relevant users. Any change on the metadata will be captured and will impact the permissions, visibility and navigation of files.
The following settings impact the editability of a file:
I. Editable for All:
a. When a File is set as “Editable for All,” it means that everyone within the “All Contributors” user group has the permission to edit the document.
b. This setting allows for an approach, where any user with access can make edits to the document.
II. Not Editable for All
a. When a File is not set as “Editable for All,” permissions are more restricted.
b. In this case, only three groups have editing capabilities.
i. Responsible Person(s): The individual designated as the responsible person for the file.
ii. Author(s): Users who have been assigned as authors of the document.
iii. Process Manager(s): in case a process is defined in the optional metadata property, the process manager will have editing capabilities of the file.
The choice of whether to make a File editable for all or restrict editing to the responsible person and authors depends on your organization’s procedures and security requirements.
Section 4: Deleting a file
Any user within the All Contributors user group can locate the file to delete it. Files are not fully deleted from SimplerQMS, rather a soft deletion is initiated. This means that the file is set to a Deleted state. Deleted files will no longer appear in any predetermined views, however they are not yet removed from regular search.
Step 4.1 – Delete a File
I. Navigate to the File you wish to delete
II. Click on the file
III. Click on Delete under State Transition

The file will be in the state Deleted.
The following settings impact the deletability of a file:
I. Deletable for All:
a. When a file is set as “Deletable for All,” it allows any user with access to initiate a soft delete.
II. Not Deletable for All:
a. When a file is not set as “Deletable for All,” only the responsible person, author, and process manager has the permission to initiate deletion of the file.
Step 4.2 – Recover a deleted File
I. Navigate to the File you wish to delete
II. Click on the file
III. Click on Filed under State Transition

The file will be in the state Filed.
Recovery time frames
I. Responsible Person: can recover the deleted file at any time within 90 days after deletion.
II. If chosen on the file, then the Author and Process Manager can also recover the file within 90 days.
III. SimplerQMS Support: After 90 days the file is Destroyed, however, if necessary, SimplerQMS Support can assist in recovering those files.
Choosing whether to make a file deletable for all or not deletable for all depends on data retention policies and need for control over file deletion.
Section 5: File Permissions
As described before, Files respect the Site, Project and Classified Document Type permissions. This means that:
I. If a Classified Document Type is selected, only users with access to the document type can see and edit the file.

II. If a Project relation is selected, only those with access to the project can see and edit the file.

III. Files are always related to at least one mandatory Site. This means only users of that site can access the file unless defined in the Responsible Person or Author fields.

Section 6: Locating Files
As files are never assigned to a user, here are some ways to navigate to them in SimplerQMS.
Step 6.1 – From Views
For the fastest way to gain an overview of all Files in your vault, you can navigate to views such as All Documents > By Class > File:

They can also be located in your Recent tab if you have filed them within the last 30 days:

The more optional metadata fields are fille in, the easier it will be to navigate files. Views like All Document > By Document Type, All Document > By Department, All Document > By Process, All Document > By Archive will contain the file if the corresponding metadata field is filled:

Step 6.2 – Through Search
Simply search for the file name in the search bar. To narrow down your search, you can place the word / phrase you are looking for in quotation marks:

If you know the System assigned ID of the file, you can narrow down your search by looking for the exact ID number.
I. To find the ID number of a file, open the metadata card.
II. The File ID is in the top left corner of the metadata:

Section 7: File History
Although files are not versioned via major versions, information about their minor updates can be seen within the history. Here you can track who made modifications to the file, when, and what were the changes by looking at the preview:

You can also roll back to previous version in case a change made was not acceptable.