Purpose
Learn how to:
- Handle documents, templates, and products with Change Request in SimplerQMS
- Create Change Requests without controlled items and handle tracking of action items.
Expected Outcome
- Users are equipped to handle Change Requests in SimplerQMS
- Document and harmonize quality documents, templates, and/or products in one Change Request
Prerequisites for all
- Must be logged in to SimplerQMS
- Must be a member of one of these ‘User Groups’ to view records:
- All internal and external users
- Must be a member of one of these ‘User Groups’ to create new records
- All Contributors
Prerequisites for creating Change Request
- Must be a member of one of these ‘User Groups’
- Change Manager
- Document Manager – sole capability on the Change Request is to reject or discard a Change Request
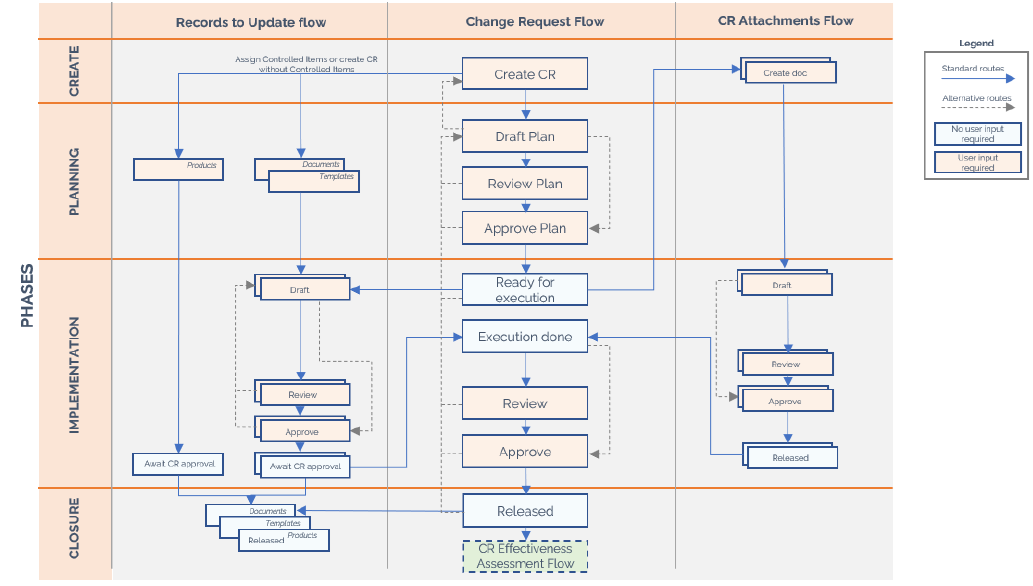
Section 1: Workflow overview
The workflow describes the end-to-end steps of accomplishing the Change Request (CR) process in SimplerQMS.
The Change Request process is an independent design of Change Request template based on the needs of the organization which can control the changes in quality documents requiring Change Request, templates, and product items all at once.
TEMPLATE CONDITIONS:
- Templates require a Change Request by default
- Templates can also be set to not require Change Request. To find out more on how to do that, refer to Work Instruction: Managing Templates
DOCUMENT CONDITIONS:
A document will require a Change Request when the following conditions are met:
- When the Document Type selected in the creation of the document is set to require a Change Request – this can be defined by a metadata administrator while setting up the Document Types.

Section 2: Creating a Change Request
Step 2.1 – Create a Change Request – Change Manager
i. Click on the Create (+) next to the Home Tab and choose Document from the dropdown list
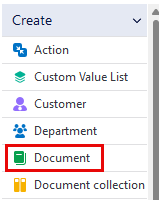
a. On the left side of the screen, expand Create and click on Document.
II. To create a Change Request from this selection, you need to define the Class as Change Request
III. Select the right template

A Metadata Card will pop up.
Step 2.2 – Fill in the Metadata Card
| Field name | Description | Note |
| Short Title* | Title of the Change Request. | |
| Site(s)* | Based on your template setup, this field should auto-populate to the Site(s) the CR Template is related to. | |
| Document Type* | Select the appropriate document type (CR). | |
| Department* | Select the appropriate department. | |
| Process* | Select the process that the change request belongs to – this is not the effected process, but the process of the Change itself. | |
| Change Type* | Select between New Change Request (for both new or update Change Request) and Retire Change Request. | See further in Step 2.3 |
| Change Priority* | A list defined by your organization. The description should be outlined in your own procedures for Change Control. | |
| Change Request Status | This field will update when the Change Request moves from one state to the next. Use this to keep track of the phase your Change Request is in. | |
| Archive | Select an archive if necessary. |
| Field name | Description | Note |
| Controlled Items* | It is in this field where you can select what kind of records your Change Request will manage. Select between Template, Document and Product (all 3 properties can be selected in one Change Request). The fields “Documents to Update”, “Templates to Update” and “Products to Update” will appear based on your selection in this field. | See further in Step 2.4 |
| Documents to Update* | This field will appear when “Document” is selected in the Controlled Items field. A list of all documents that are required to have a Change Request will appear and you can select the ones you would like to manage with the currently created CR. | See further in Step 2.4 |
| Product Item(s) to Update* | This field will appear when “Product” is selected in the Controlled Items field. A list of all products will appear, and you can select the ones you would like to manage with the currently created CR. | See further in Step 2.4 |
| Templates to Update* | This field will appear when “Template” is selected in the Controlled Items field. A list of all templates that are required to have a Change Request will appear and you can select the ones you would like to manage with the currently created CR. | See further in Step 2.4 |
| Field name | Description | Note |
| Affected Processes | In this list you can choose any process(es) you wish to make changes to. Choosing a process here will not impact the process metadata element in SimplerQMS, it is only a relationship. | See further in Step 2.4 |
| Relation(s) | You can choose any relation from the list, and it will populate a corresponding field for the specific item to relate. When a relation is chosen, it is mandatory to add the specific metadata element / item from the system before you can continue. | See further in Step 2.4 |
| Field name | Description | Note |
| Conclusion Plan | Describe the conclusion you reached at the end of your planning process. | See further in Step 3.3 |
| Conclusion of Closure | Describe the conclusion you reached after implementation and closure of CR. | See further in Step 6.3 |
| Field name | Description | Note |
| Responsible Person* | The person responsible for the CR. | |
| Author(s)* | Assigned to draft the CR Plan and conclusion. | |
| Plan Reviewer(s) | Assigned to review the plan of the CR. | |
| Plan Approver(s)* | Assigned to approve the plan of the CR. | |
| Reviewers | Assigned to review the Entire CR at closure. | |
| Approver(s)* | Assigned to approve the Entire CR at closure. | |
| Due Date* | An estimate on when the CR should be released. | |
| Effective Date | Effective date of the CR which also take in effect in the properties (document, template & products) of the CR. | See further in Step 7.2 |
I. Click Create after filling out all necessary information in the metadata card.
II. Working copy of the Change Request document launches in Word (or in the application where it was initiated).
III. You can immediately start to draft the initial version of your Change Request Plan section if needed (refer to Section 3, Step 3.2 for plan authoring)
IV. Save and check in the Change Request document and go back to SimplerQMS.
The assignment description in the Change Request metadata card can be used for guidance. The Assignment Description updates after each state transition.

Step 2.3 – Choose a Change Request Type – Initiator
To determine what a Change Request will be used for, you need to choose from the two options available under Change Type:
- “New Change Request” Change Type
- Used to update newly created records so they receive their ID and can be processed, then released
- Used to update existing records so they can be moved to a new Major Version.
- “Retire Request” Change Type
- Used to control the retirement of records.

Step 2.4 – Creating Change Requests without Controlled Items
In the case that you would like change requests without controlled items, you are free to leave the Controlled Items field of the metadata empty. It is recommended to make use of the Affected Processes and Relations fields in these instances, but you can also run a change request with all fields of scope completely empty.
Relating any item to the change request that is not a Document, Product Item or Template in the Controlled Items field will stay unaffected unless you make changes to it. They will not update automatically like the controlled items do when the change request plan is approved.
Step 2.5 – Change Request Controlled Items
The records that a Change Request control are defined by what you have entered in the metadata card of the Change Request. The documents, templates, and/or products you include are selected in their respective fields, which are controlled by the Controlled Items field, as described in the metadata section above (Step 2.2).

- When new records that require a change request are created, they will only be assigned a document ID once the Change Request Plan is released.
- Once a newly created record is included in a Change Request, both document and template in the change request will go on “Pending Change Approval” state
- A product will be on “Ready for Approval” state and awaits release by the Approval of the Entire Change Request

NOTE: The flow in this work instruction will follow the processing of new records controlled by a Change Request.
To learn about the update/retirement process of existing records, refer to Section 8.
Step 2.6 – Edit Preliminary Document / Template – Author
If you wish to make changes to the Document or Template associated to the Change Request before the Change Request Plan is approved, they should be moved to the “Edit Preliminary” state. In this state the metadata and the content of the document can be edited.
NOTE: The Change Request Plan can only be approved if all related templates and documents are on the state “Pending Change Approval” and will not progress with these items in “Edit Preliminary” states.
Document – Author / Responsible Person/ Process Manager
Click on the CR related quality document and click on “Edit Preliminary Document”. The state changes from “Pending Change Approval” to “Edit Preliminary Document”.

When you are done editing the metadata and/or the document content, click on Editing Completed.

NOTE: If in this state, you make changes to the document type and choose one that does not require change request, when Editing Completed is clicked, the document will receive a document number and will be released from needing change request. This is your way of changing the document type if you have chosen the wrong settings the first time.
Template – Template Author / Responsible Person / Process Manager
Click on the CR related template and click on “Edit Preliminary Template”. The state changes from “Pending Change Approval” to “Edit Preliminary Template”.

When you are done editing the metadata and/or the template, click on “Editing Completed”.

NOTE: Controlling if Templates require CR is still done through the “Set Template Not to Require CR” and “Set Template to require CR” buttons, which are accessible for the Template Responsible Person and Process Manager. The template does not need to be in the “Edit Preliminary” state to be taken off of CR.
Step 2.7 – Change Scope of CR – Change Manager/ Responsible Person
If you have created your Change Request but realize that you would like to add other records to it, you can do that by selecting your CR and clicking on “Change Scope of CR” under State Transition. The state should change to Change Scope of CR.

Clicking the button will enable you to modify the Controlled Items and Other Affected Items flieds within the metadata. You are allowed to add or remove record types and add or remove documents, products, or templates from what was previously set. You can also make changes to the Affected Processes and Relations sections.
By clicking save, the new changes should be visible on the metadata card.
Under State Transition, click on “Route to Draft” to execute changes.

State should go back to “New Draft”.
NOTE: If at any further point the Change Request is routed back to draft the option to “Change Scope of CR” will be available again.
Section 3: Change Request Planning
The planning phase of the Change Request will happen mainly inside the Change Request Document that you have created. It will be processed similarly to a quality document, by going through the authoring, reviewing and approval process.
Step 3.1 – Draft the Plan and Send the Change Request Plan for Review –Author
I. Check out the Change Request document
II. Draft the Change Request with all the necessary information describing all the changes that will be done when the Change Request is executed
III. Click Save and check in the document to SimplerQMS
IV. Route the Change Request for plan review: under State Transition, click on Route Plan for Review (Skip this step when there is no reviewer assigned)
a. If there were no reviewers assigned initially, you can add them at this stage.

Step 3.2 – Review of a Change Request Plan – Plan Reviewer
When the Change Request Plan has been routed for a review, it gets assigned to the plan reviewer(s) and the State in the metadata becomes ”Plan Review Ongoing”.
I. Check out the Change Request document, launches in Word (or other applications the document was initiated from)
II. Review the document and add changes if necessary
a. Reviewer has editing capabilities for the document
III. Save and close the document
IV. When the review has been completed, click on “My Plan Review Task Completed” under state transition.
a. If there are too many modifications needed after the review process, it is recommended to route the Change Request back to draft by pressing “Route Back to Draft” instead of “My Plan Review Task Completed”.

Step 3.3 – Final draft of the Change Request Plan and Send for Approval – Author
When the Change Request plan has been reviewed, it is assigned again to the author and the State in the metadata is “Plan Review Closed”.
I. Check out the Change Request document, launches in Word (or other applications the document was initiated from)
II. Make the final changes in the document
a. If too many modifications have been made, it is recommended to send the Change Request Plan for another review by clicking on “Route for Another Review” under State Transition
III. Save and close the document
IV. Prior to sending for approval, fill out the Conclusion of Plan section in the metadata – provide an overview of the conclusion of the plan for the Change Request.

V. Click on Save in the metadata card
VI. Under State Transition, click on “Route for Plan Approval”.
a. The option to “Route Plan for Another Review” is also available. Refer to Step 3.2 if needed.

Step 3.4 – Approve the Change Request Plan – Plan Approver
The Change Request should now be assigned to the approver and the state is “Awaits Plan Signature(s)”. In this state, the document and the metadata are no longer editable.
I. Select the Change Request, under State Transition, click on Approve Plan
a. If the Plan does not meet expectations, you can “Route Back to Draft”.

II. Approve the plan with your electronic signature using your SimplerQMS log-in and password
III. State changes to “Ready for Execution” and the document stays assigned to the author.
IV. Check that the documents and templates associated with the Change Request have been given a unique ID and their state changed to Draft. These records can now be processed.
a. For updating documents, and templates, it is at this point that you can start the update process.
b. Refer to Step 5 for further instructions.
Section 4: CR Attachment
(Skip this step if your organization is not using CR Attachments)
Step 4.1 – Create a Change Request Attachment – Author
To create a CR Attachment, click on “Create Change Request Attachment” under Actions

A metadata card will pop up and the class will default to Quality Document. Choose the appropriate template.
Step 4.2- Fill in the Metadata Card
| Field name | Description | Note |
| Short Title* | The title will default to Parent: (CR title). You can change that if necessary. | |
| Site(s)* | Will default to the CR site | |
| Document Type | Will default to “Change Request Attachment” | |
| Department | Will default to CR department | |
| Process* | Select the process that the document belongs to | |
| Archive | Select an archive if necessary |
| Field name | Description | Note |
| Requires Change Request | Filled by the system based on document type | |
| Requires Periodic Review | Filled by the system based on document type |
| Field name | Description | Note |
| Responsible Person* | The person assigned to a specific document with broader access rights and the responsible for periodic review. | |
| Author(s)* | Person that drafts/authors the document. | |
| Reviewers | Only fill if a review is needed for the document; this person has the same access/edit rights to as the author in the review process. | |
| Approver(s)* | Person to approve the release of the document. | |
| Due Date | When a due date is set, the system will send out automatic 3-days before due date notifications to the Responsible Person, author, and QA team to notify the involved parties about the need to complete the document. | |
| Effective Date | Effective date of the CR Attachment. |
| Field name | Description | Note |
| Relations | Add Relations to other records within the system. | |
| Regulation Chapter | Add the regulation chapter that covers change control. | |
| Parent Document | This field will contain the reference to the Main CR Plan as a parent document. | |
| Initiated from Template | Will be filled automatically once the document is created based on the template that was used. |
I. Click Create after filling out all necessary information on the metadata card.
II. Working copy of the new quality document launches in Word (or in other the applications where CR Attachment was initiated).
III. Modify or draft the document if needed.
IV. Save and check in the document and go back to SimplerQMS.
V. The CR Attachment will be in the state “New Draft”, and it should be assigned to the author
a. Once a CR Attachment is created, The CR Attachment can be processed at the same time as the records related to the main Change Request.
VI. Processing a CR Attachment is the same as a Quality Document without Change Request. To find instructions on how to do that, refer to Work Instruction: Managing Quality Documents.
NOTE: All CR Attachments must be approved and released before the Entire Change Request can be sent for review and approval.
Section 5: Executing the Changes in the Controlled Items
All records included in the CR Scope must be approved/updated before the Entire Change Request can be sent for review and approval.

Step 5.1 – Author, Review and Approve the Template
- Refer to Work Instruction: Managing Templates
- For New Templates: Sections 4, 6, 7 and 8
- For Updates: Section 9
- For Retirement: Section 10
Once the Template has been processed, it will stay on state “Awaits CR Approval” until the Entire Change Request is closed and released.
Step 5.2 – Author, Review and Approve the Quality Document
- Refer to Work Instruction: Managing Quality Documents
- For New Quality Documents: Sections 3, 5, 6 and 7
- For Updates: Section 9
- For Retirement: Section 10
Once the Quality Document has been processed, it will stay on state “Awaits CR Approval” until the Entire Change Request is closed and released.
Step 5.3 – Product
Products do not require extra processing once created, sent for update, or sent for retirement.
When a product is included in a Change Request Scope, it will stay on state “Ready for Approval” until the Entire Change Request is closed and released.
Step 5.4 – Affected Processes / Relations
The items in these fields will not update automatically. There are a couple of options for you to track the updates you make, from highest to lowest risk:
Option 1: Track completion within CR Document
Your first option is to create a change request template, and then Change Request Document that allows the tracking of all progress made within the CR document itself. Since you are not creating any external trackers, the system will not block you from going through the final approval of the CR. This means that there is a higher risk of forgetting to complete a change you intended to make, both regarding elements inside SimplerQMS and changes you intend to make to your processes / items outside of the system.
Option 2: Track completion via CR Attachment
You can make use of the attachment feature mentioned in Section 4 which will allow you to create one or more quality documents that you could use to track the progress being made on all related items. The separate document(s) would need to be approved before the CR final approval. This would ensure that at least one tracking item is created for the changes you intend to make which would block the final approval of the CR until everything is completed.
The CR attachment would need to be approved before you can progress further.
Option 3: Initiate Actions to delegate work and track completion in CR document
You can create as many Change Actions as you need based on the Plan you have drafted. These can also be assigned to different people. Pending CR actions will block the final approval of the CR until all related actions have been completed. This ensures that every action item you have planned will be handled and only then you are able to move on with the final approval of the CR, minimizing the risk of incomplete items.
The easiest way to create a Change Action is to use the button under the Actions group on the left side of the screen:

An automatic relationship will be established between the Change Request and the Action in the Relations section of the Action. You can add additional relationships to others items needing to be changed, but ensure that the relationship to the CR does not get removed:

For further information about the action metadata and management, refer to WI: Actions, Periodic Tasks and Reminder Rule.
Once the Action is created, it will be present in the Detailed Listings of the CR, where you can track the progress made:

Once all the actions are completed, you can move on to the final approval of the CR.
NOTE: CR Actions can be used on any change request, regardless of the items included in scope. It is a great way to track progress on action items that are not controlled via SimplerQMS.
Section 6: Reviewing and Approving the Entire Change Request
Step 6.1 – Send Entire Change Request Conclusion for Review- Author
Once all records, Actions and CR Attachments (if needed) have been processed and approved, the Change Request author will be notified that the CR is ready to be sent for review.
I. Check out the Change Request document, launches in Word (or other applications the document was initiated from)
II. Make the final changes in the document
III. Fill in the Conclusion of Closure section in the metadata.
IV. Send the Change Request for review. Under State Transition, click on “Route for Review” (only when there is an assigned reviewer to the CR)
a. Alternatively, if no reviewer is assigned or the CR ends up not needing a review, click on “Route for Approval without Review”
b. If there were no reviewers assigned initially, you can add them at this stage.

Step 6.2 – Complete the Review of the Entire Change Request – Reviewer
When the Change Request has been routed for a review, it assigns to the CR Reviewer and the State in the metadata is “Review Ongoing”.
I. Check out the Change Request document, launches in Word (or other applications the document was initiated from).
II. Review the document
a. Reviewer has the same level of access rights to the document as the author when it is on the “Review Ongoing” state.
III. Save and close the document. Check in to SimplerQMS.
IV. When the review has been completed, click on “My Review Task Completed” under State Transition if the number of modifications needed are acceptable
a. If there are too many modifications needed after the review process, it is recommended to route the Change Request back to draft by pressing “Route Back to Draft” instead of “My Review Task Completed”.

Step 6.3 – Final draft of the Entire Change Request and Send for Approval – Author
When the Entire Change Request has been reviewed, it is assigned again to the author and the State in the metadata is “Review Closed”.
I. Check out the Change Request document, launches in Word (or other applications the document was initiated from)
II. Make the final changes in the document
a. If too many modifications have been made, it is recommended to send the Change Request for another review by clicking on “Route for Another Review” under State Transition
III. Save and close the document
IV. Prior to sending for approval, fill out the Conclusion of Closure section in the metadata – provide an overview of the conclusion of the Entire Change Request.

V. Set the effective date in the metadata card (Change Request cannot be routed for approval without the effective date).
a. The effective date cannot be a historical date.
b. You can set the effective date far away into the future; however, this is not recommended from a regulatory perspective. This is further explained in the next step.
VI. Click on Save in the metadata card
VII. Under State Transition, click on “Route for Approval”.

NOTE: The option to “Reject the Entire Change Request” is last available at this stage. When this button is pressed, the Entire Change Request will be discarded and all records related will await the creation of an entirely new Change Request from start to finish.
I. To reject, click on “Reject Entire Change Request”
II. Enter your electronic signature and then click OK.
a. An “Exceptions” box is available to write an explanation as to why the Change Request was rejected entirely.
III. The state of the Change Request will change to “Discarded Change Request”
This kind of rejection does NOT correspond with the Rejection by the approver. There, the document will go back to initial draft, but will NOT be discarded. See further in Step 6.4 below.
Step 6.4 – Approve the Entire Change Request – Approver
The Change Request should now be assigned to the approver and the state is “Awaits Approval Signature(s)”. In this state, the document and the metadata are no longer editable.
I. Select the Change Request, under State Transition, click on “Approve Change Request”
a. If the CR does not meet expectations, you can “Reject Change Request”. This will send the Change Request back to the initial draft plan and you need to carry out all steps excluding Section 5. This also enables you to add additional records to the Change Request if really necessary.

II. Approve the Change Request with your electronic signature using your SimplerQMS log-in and password
III. State changes to Preparing Approvals until all records related to the Change Request become effective.
Section 7: Assessing the Effectiveness of the Change Request
Please see work instruction: WI – Assessing Effectiveness of Change Request for detailed
step-by-step instructions on evaluating a Change Request’s effectiveness.
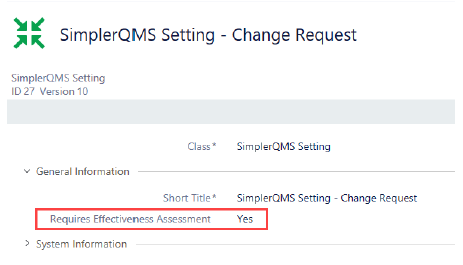
The Metadata Administrator can configure Change Requests to require an Effectiveness
Assessment in SimplerQMS Settings. This setting determines whether an assessment must be
conducted before closing a Change Request.
- Go to Masterdata Views > SimplerQMS Settings.
- Select SimplerQMS Setting – Change Request
- Update the Requires Effectiveness Assessment setting in the metadata
Section 8: Releasing Change Request and Related Records – System
Step 8.1 – Check Change Request and Related Records
After all documents were released, the state of the Change Request will change to Update Completed.
If the effective date is set to be on the day of approval, the Change Request will be released as a PDF and in state “Effective”.
Check that the records controlled by the Change Request have been Released.

NOTE: Related Items and Affected Processes will not be changed despite being in a change request. Those items will only be updated if you have update them manually in the Ready for Execution state of the CR.
Step 8.2 – Make Change Request Effective Immediately
If the effective date of the CR is set in the future, the working copy will change to state Update Completed, but the PDF copy will be on the state “For Learning”.
Setting the effective date of the CR in the future will affect all related records. They will be completed, but each will go into their respective state to await effective date. The CR Main Document and all related records will only be released when the effective date is reached.
Quality documents controlled by the CR will be on State “For Learning”.
Templates and Products controlled by the CR will be on State “Awaiting Effective Date”.

The Change Request can be released by the responsible person by clicking on the released version (PDF) of the main Change Request document and clicking on “Make Effective Immediately” under State Transition.

Products get released together with the Change Request.
The major implication of a future effective date on a CR that controls multiple documents and templates, is that to release all related documents and templates, each will have to be made effective immediately by the responsible person.
To do this, refer to Work Instruction: Managing Quality Documents, Section 8 and Work Instruction: Managing Templates, Section 9.
NOTE: The working copy of the document will keep the original effective date, but all released versions will update to the date when the CR was made effective immediately.
Refer to Section 8 for Updates and Retirement.
Section 9: Change Request for Updates and Retirement
Creating and managing a Change Request for updates and retirement is a similar process to what you have read about above in this Work Instruction.
- As described in Step 2.3, Change Type is what decides what a Change Request can be used for.
- Once you have chosen the type of Change Request you want to create, adding records to update or retire are based on the steps described in Step 2.4.
- Similarly, to the processing of new records, until the Change Request Plan is approved, individual actions on related records are not possible. This is to confirm that these records CANNOT move forward without approving the Change Request Plan.
Step 9.1 – Update of Records controlled by a Change Request
Existing records controlled by a Change Request can be updated to a new major version only if they are documented in a Change Request.
- When multiple records are added to a Change Request for update, they will move into their respective state for updating once the Change Request Plan is approved

- Find the update process of:
- Documents: Work Instruction: Managing Quality Documents
- Templates: Work Instruction: Managing Templates
- Products: Work Instruction: Managing Products
- Records will only become editable once the Change Request Plan is approved
- They will become effective only once the Entire Change Request is released and effective
Step 9.2 – Retirement of Records controlled by a Change Request
Existing records controlled by a Change Request can only be retired if they are documented in a Retire Request.
- The records to retire will become related to the Change Request but will not change state from their effective/ released state until the Entire Change Request is Approved.
- Once the Entire Change Request is approved, all related records will move to “Retired” state. It is NOT required that you individually process them.

- Follow Sections 2 to 7, but exclude Section 4 (if your organization does not use CR Attachments) and Section 5 (as records do not need to be processed individually)