Purpose
Learn how to:
- Set up/install M-Files/SimplerQMS application on a Windows platform
- Get around M-Files/SimplerQMS application on a Windows platform
- Navigate and learn the basic functions
Expected Outcome
- Users are equipped to handle basic functionality of M-Files in SimplerQMS
Prerequisites for all
- Must be using Windows to use the application
- For Mac users, must have Chrome browser installed
- Must be logged in to SimplerQMS
- Must be a member of one of these ‘User Groups’ to view records:
- All internal and external users
- Must be a member of one of these ‘User Groups’ to view records:
- All Contributors
Section 1: Learn about M-files and SimplerQMS
M-Files is a document management system, which can be designed into a platform for different services.
SimplerQMS configured M-Files into the eQMS system that you know today and continuously validates the software to stay compliant. Features have been specifically engineered to service the needs of customers in the medical device and pharmaceutical industry, laboratories, and small consultancies.
If you would like to get to know more about M-Files, visit this link: https://www.m-files.com/about/
Section 2: Install M-Files and Add Vault Connection on Windows
The M-Files desktop application is ONLY compatible with Windows computers. To get started with installing the M-Files/SimplerQMS application, follow the instructions from this guide:
For training vault: https://www.simplerqms.com/knowledge-base/installing-m-files-on-windows-adding-connection-to-test-environment/
For production vault: https://www.simplerqms.com/knowledge-base/installing-simplerqms-m-files-on-windows-and-adding-production-vault/
Section 3: Setting up M-Files in Chrome Browser
If you are using a different operating system other than Windows, M-Files can be accessed through Chrome. To get started, follow the instructions from this guide:
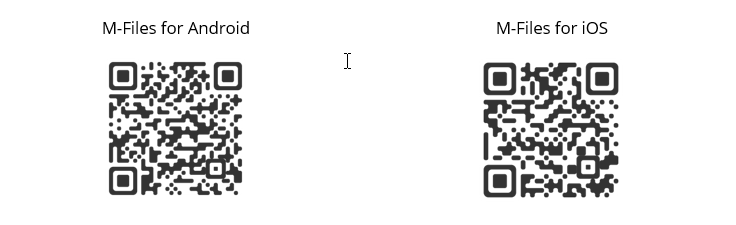
Section 4: Using M-Files on Mobile (Android and iOS)
For an on-the-go solution, you can install M-Files on your mobile device. With the mobile applications, you can see vault content, approve documents, or mark assignments complete, and create or share objects.
Section 5: Accessing M-Files/SimplerQMS on a Windows PC
Once you have installed the M-Files application and added your company’s vault connection, you can start using SimplerQMS in M-Files.
There are multiple ways to access SimplerQMS:
I. On your desktop, double- click on the M-Files application. 
II. Using the file explorer navigate to This PC. A new drive is created for M-Files when the application is installed. Double-click on the drive.

III. On the lower right of your screen, access hidden icons (the arrow pointing up) and doble-click on the M-Files logo.
Using either option, once you have accessed the system you can get started with using SimplerQMS.
Section 6: Interface
The SimplerQMS interface is built up by 4 main components:
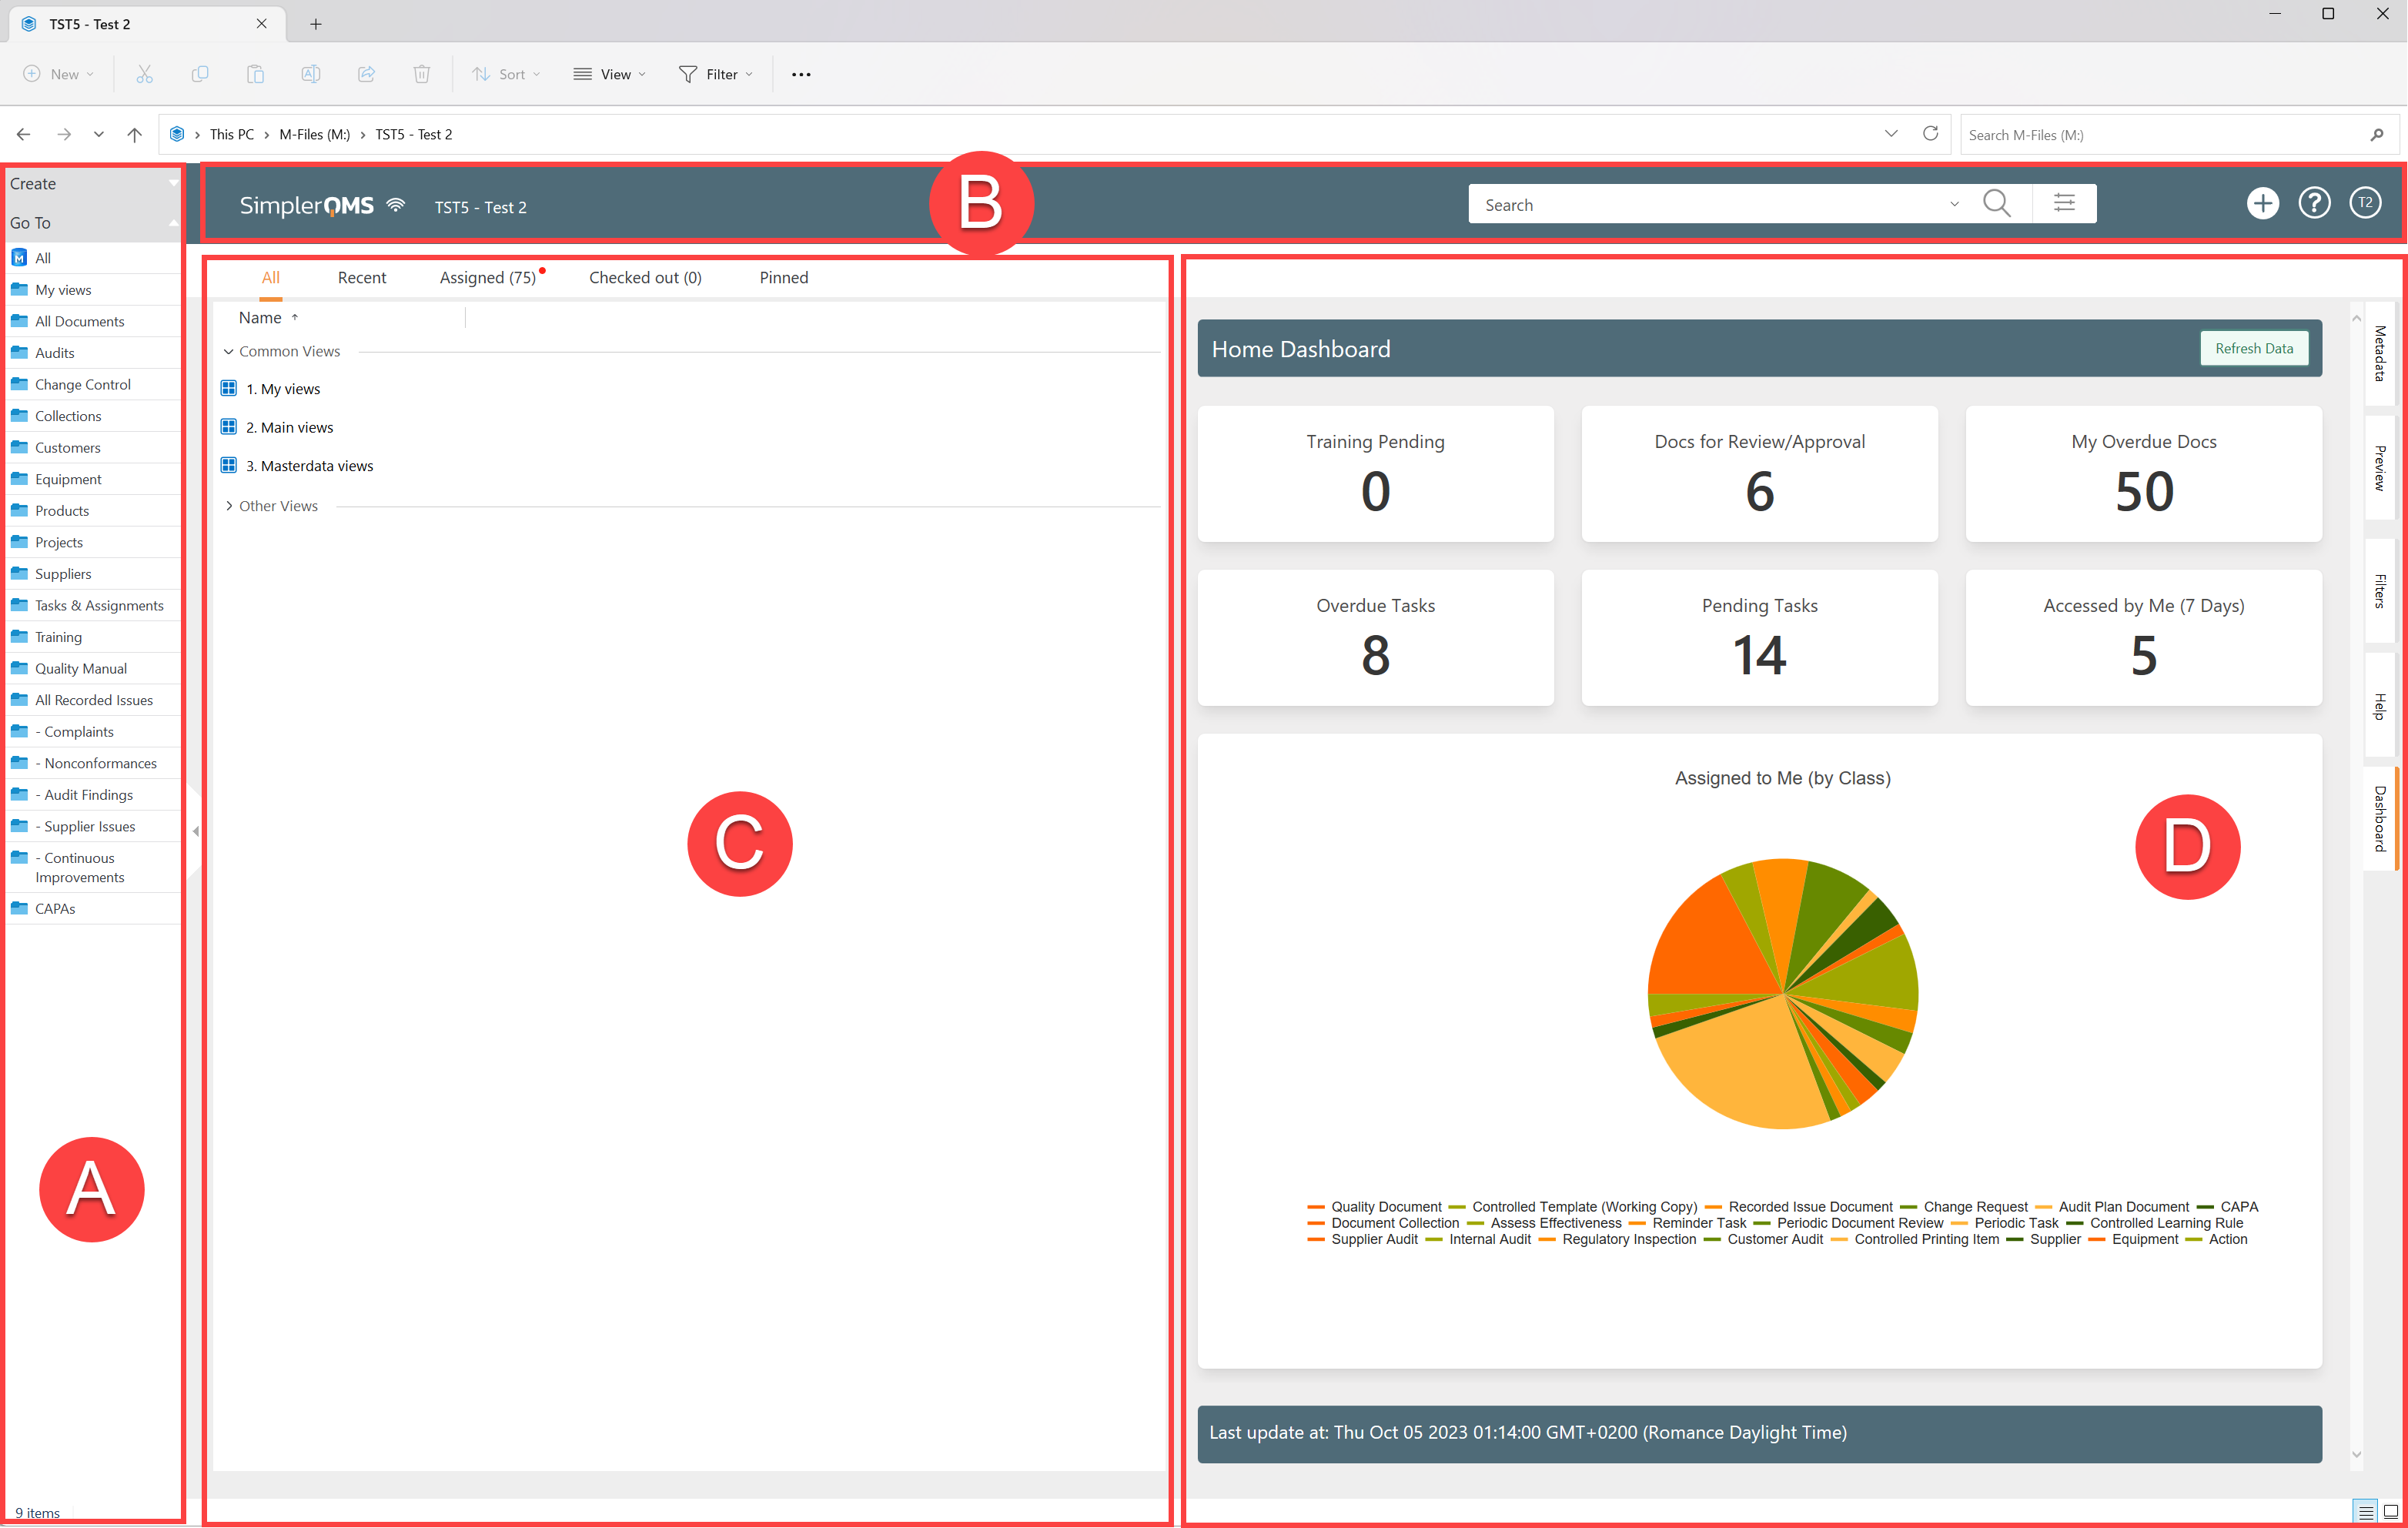
A. Task Area – contains the Create section and all Main Views. This is the area where Actions and State Transitions will appear as well.
B. Search bar and Main Navigation Tabs – for quick search. This area also contains the Create button which you can use to create records and items in the system.
C. Listing Area – By default opens to the All tab containing the main navigation views. Top section contains all common navigation panes like Recent, Assigned, Checked Out and Pinned.
D. Right Pane – By default it opens on Dashboard, showing personalized reports of your pending and overdue tasks, trainings and documents.
- You can also access the Help tab (Section 8) from this section.
- When a record is clicked, the Metadata (Section 9), Preview (Section 10) or Workflow (Section 11) can be accessed from here.
- Filters will activate when you start using the Quick Search bar (Section 12).
Tabs on the center Listings Area:
I. All – contains 3 view categories
1. My views – contains all the views which focus on all items in the system related to you in some way – e.g. All Documents Related to you, All Tasks and Assignments Related to you
2. Main views – the core views for navigating the system, such as All Documents, Quality Manual, Equipment, Suppliers etc. – this is replicated on the Task Area as well under the Go To section
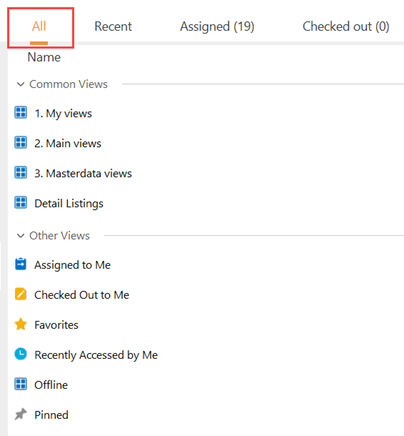
3. Masterdata views – Contains all system elements that are managed by the Metadata Administrator. As a general user, this view gives you access to the structure of your system, containing the list of Sites, Departments, Processes, Departments and more.
4. Other views – Assigned to Me, Checked Out to Me, Recently Accessed by Me and Pinned from the top bar. Favorites (discontinued feature) and Offline are also located here.
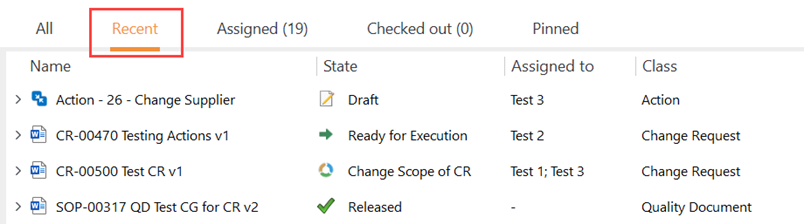
II. Recent or Recently Accessed by Me – access to documents or objects that a user has accessed within the past 30 days.
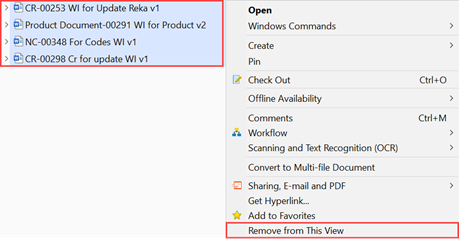
NOTE: If you wish to remove an object from this view, right-click on it then select Remove from this View.
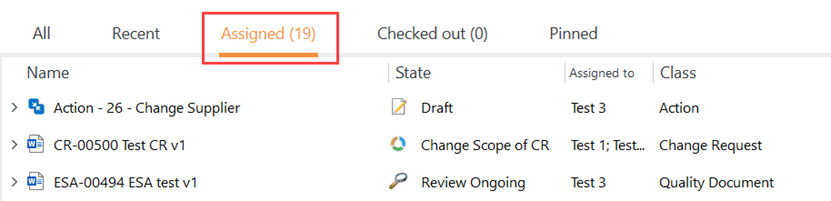
III. Assigned to Me – documents or objects in this view are assigned to you either as author, reviewer or approver, responsible person or trainee. You also receive an email notification about the document or object that is assigned to you depending on the vault’s notification settings. The tab will also mark how many items are pending in your assigned to me.
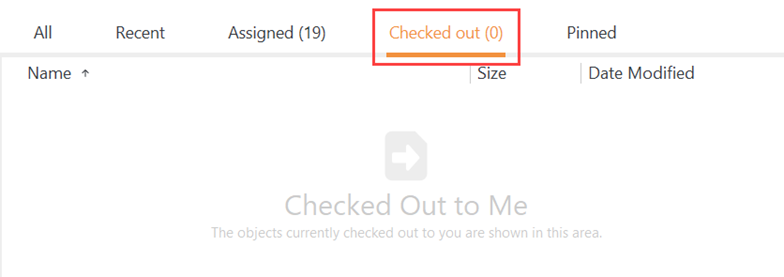
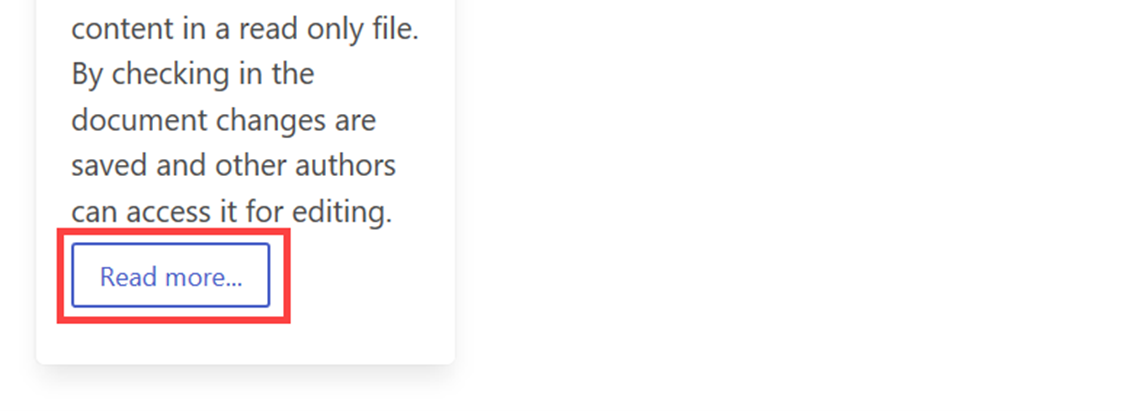
IV. Checked Out to Me – this view will show the documents that are currently checked out to you. It is very important that at the end of a workday this section is completely empty as every document checked out to you will only save changes once it is checked back into SimplerQMS. (Refer to Section 20)
V. Pinned
Think of this as a desktop within SimplerQMS. Pinned allows you to collect items that you frequently use into a single tab. It is a collection of shortcuts that provides quick access to your most accessed resources.
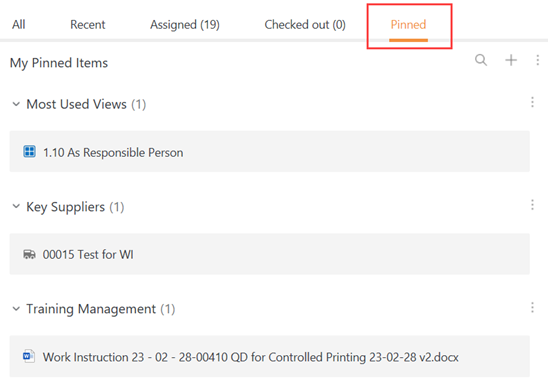
You can pin anything within the system that you would like to access quickly. You can still navigate the system while the Pinned view is open, so finding the relevant object and adding and organizing them is possible at the same time.
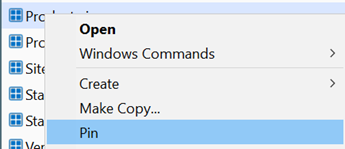
Adding items to Pinned can be done either from the metadata, using the ![]()
![]() pin button, or by right clicking on an item inside and clicking on Pin.
pin button, or by right clicking on an item inside and clicking on Pin.
These items can be easily unpinned by right-clicking and selecting Unpin.
Inside Pinned you can create groups so you can categorize the shortcuts into areas of their own. Use the ![]()
![]() button to add more groups. You can collapse or expand, rename or remove groups as well by clicking on the
button to add more groups. You can collapse or expand, rename or remove groups as well by clicking on the ![]() button.
button.

You can also search specifically within the pinned tab if you have added many different elements and need to find them quickly.
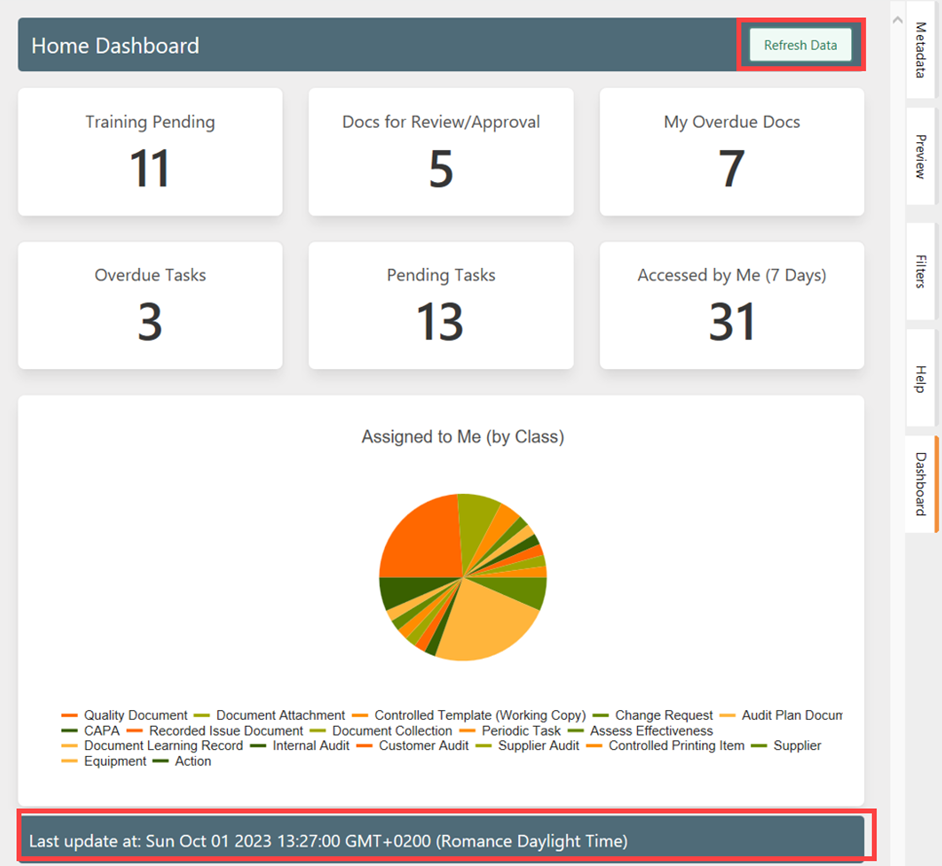
Section 7: Home Dashboard
Upon logging in, you will be shown the Home Dashboard. This is a personalized hub providing immediate access to critical metrics. These help you effectively navigate and utilize key views and showcasing actionable insights into your work within SimplerQMS.
You can always navigate back to the Dashboard as well by clicking on the dashboard tab in the Right Pane.
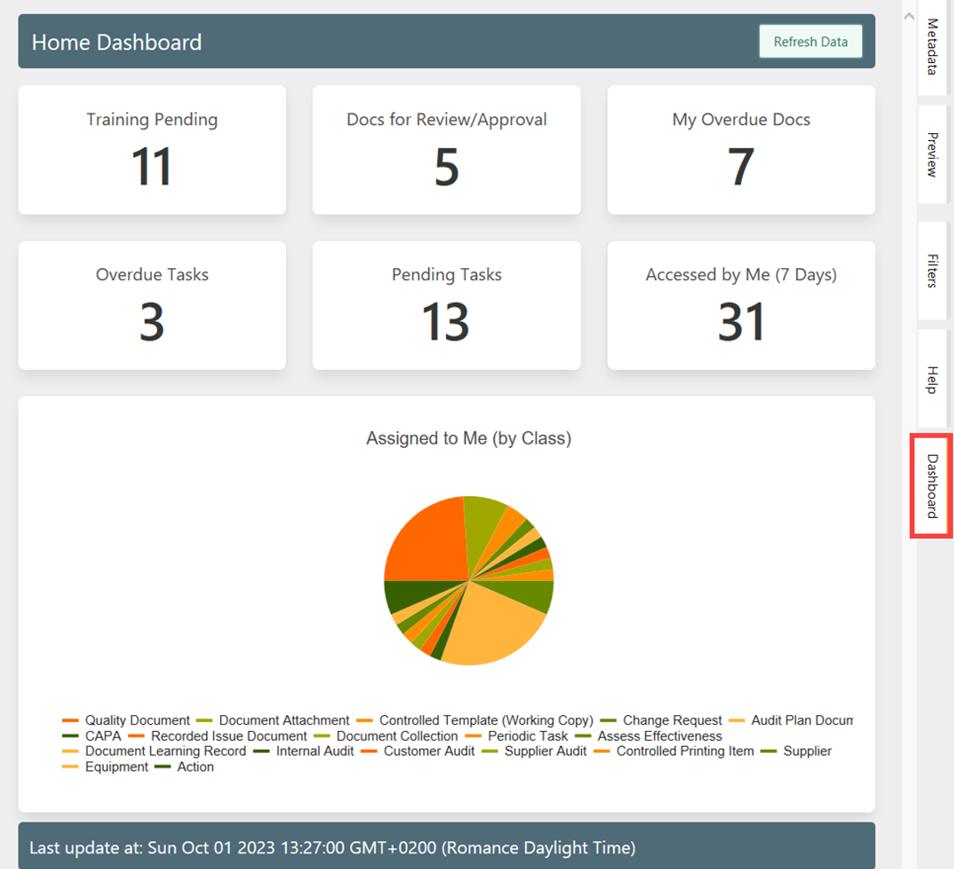
Please note that this feature is currently only available on the Windows Client of SimplerQMS.
You don’t need to navigate through multiple menus or lengthy lists. Each tile on the Home Dashboard represents a specific view. To address pending items, simply click on the relevant tile. This will navigate you to the view where you can tend to the pending or overdue tasks, training records or review and sign pending documents:
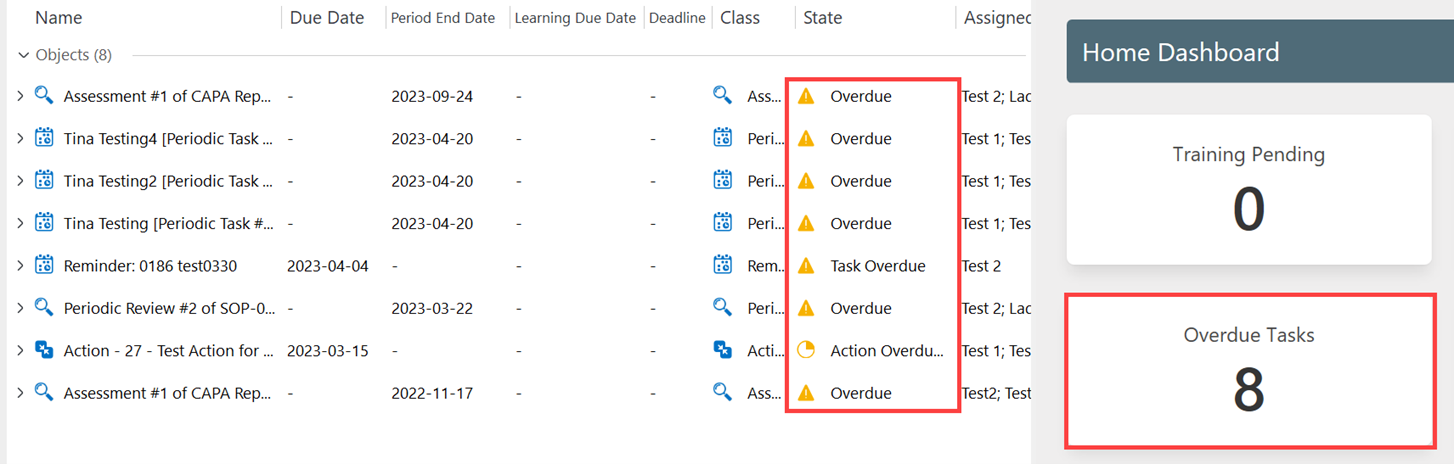
The Home Dashboard provides real-time updates, ensuring that you have immediate visibility into the latest assignments that require your attention. Stay informed and respond promptly to new tasks and responsibilities as they arise.
You can also manually refresh the dashboard each time you suspect new assignments became available. Click on Refresh Data to view the latest updates on your assigned tasks:
Section 8: Helpdesk/Support
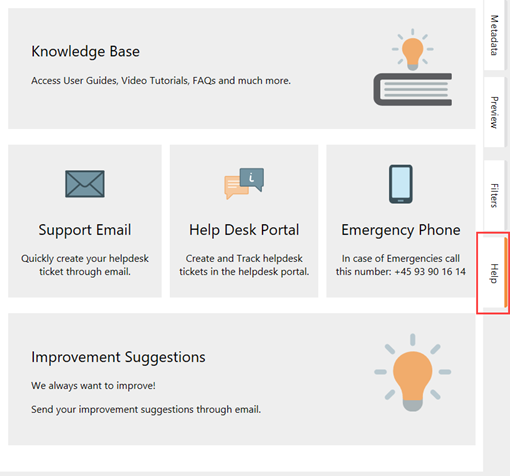
Within SimplerQMS you can easily access our Helpdesk and Emergency Contact options, as well as our Knowledge Base full of useful articles and Work Instructions.
To do this, click on the Help Tab in the Right Pane.
From here you can directly email our support mail which will redirect your inquiry into our Helpdesk Portal. You can also access the Portal directly and ask your questions there.
For answers on our frequently asked questions and to locate our work instructions, take a look at our Knowledge Base.
In case of big emergencies, reach out to us via the phone number you see on the Help tab.
Section 9: Metadata Card
Metadata is the backbone of SimplerQMS. All documents and objects within the system are tagged with metadata. This makes it easier to find the information you are looking for within the vault. Regardless of the way documents are saved to M-Files, you must always fill in the metadata card prior to creating / filing the document.
On the next page you will see a sample metadata card of a quality document. The metadata card is dynamic and will always include different fields based on the item’s Class.
1. Title – The full title of the document.
2. Status – this section includes creation, modification, check-out, and signature related information.
3. Assignment Information – Includes the Assignment Description, which guides you through the workflow step by step. Also shows who the item is assigned to.
4. Document Information – Values defined at creation used for the title and filtering.
5. Change Control – provides details whether a document requires Change Request and Periodic Review. (This section is not present on all documents)
6. Workflow Process Information – contains assigned roles for this document, due date, effective date and review and approval information.
7. Approval and Reviewer Information – remaining and completed reviews and approvals.
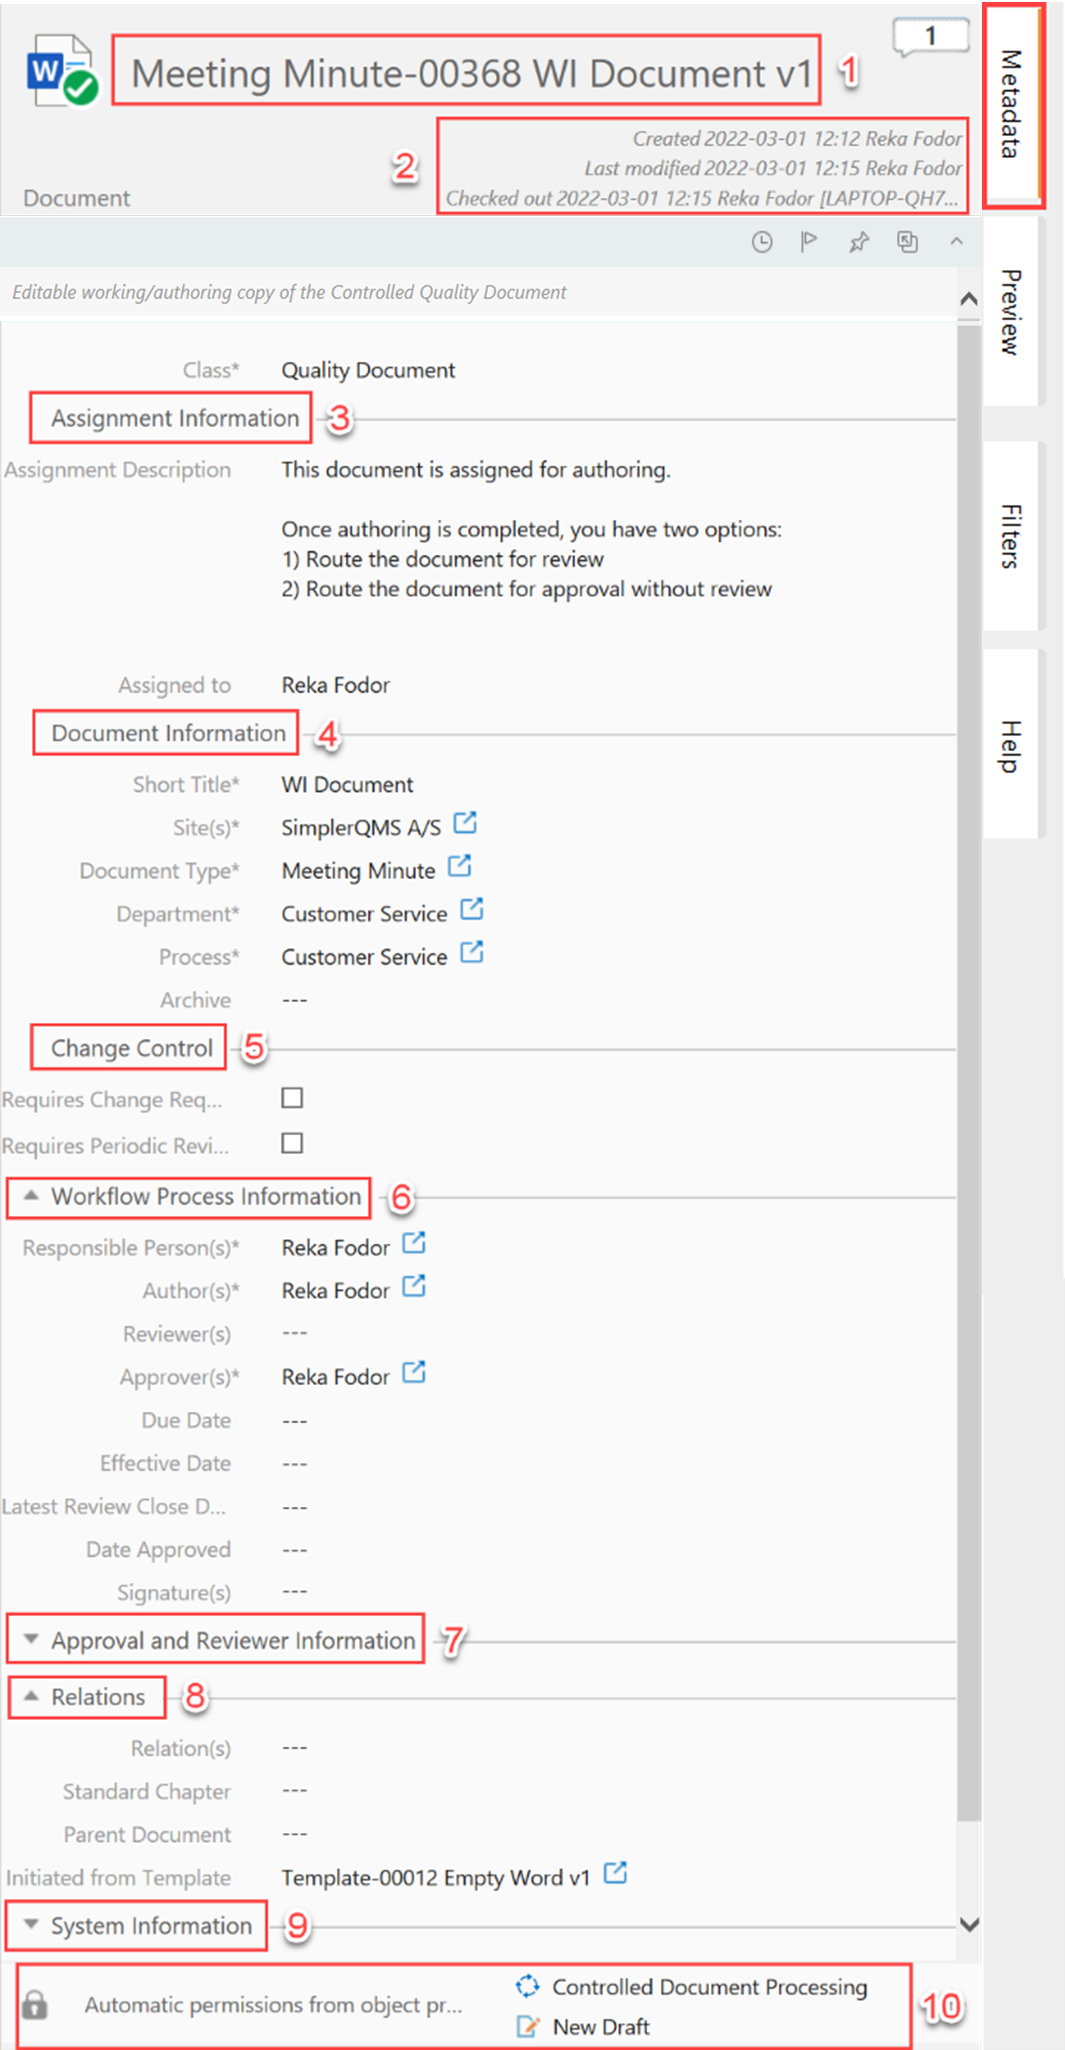
8. Relations – relations to other items, standard chapters, parent document and template.
9. System Information – additional information – includes a description field for additional information and migration reference fields if you wish to refer to your paper records.
10. Permission, Workflow & State – this area describes user access to the record, workflow applied, and the current state of the document.
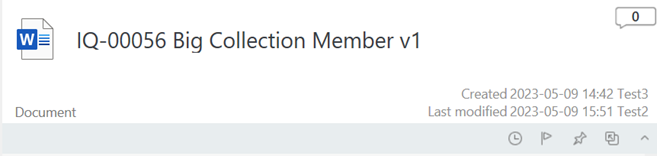
NOTE: The full title of documents in SimplerQMS consists of the Document Type + Unique ID assigned by the system + Short Title + Major Version Number.

The unique ID will at first consist of 5 digits but will increase after you have surpassed that number of documents.
The Metadata Card also includes a light blue bar, which changes between green (approved) and red (archived or retired) to visualize different states of documents. Regardless of the color, this section includes very useful buttons:
![]()
![]() Open history (audit trail)
Open history (audit trail)
![]()
![]() Flagging an item will turn on notifications, so as it progresses through the different workflow steps you will be notified each time a change is made.
Flagging an item will turn on notifications, so as it progresses through the different workflow steps you will be notified each time a change is made.
![]()
![]() Pinning an item will add it to the Pinned Tab (Section 9).
Pinning an item will add it to the Pinned Tab (Section 9).
![]()
![]() This icon will open the metadata card in a new window.
This icon will open the metadata card in a new window.
![]()
![]() Collapse the title section.
Collapse the title section.
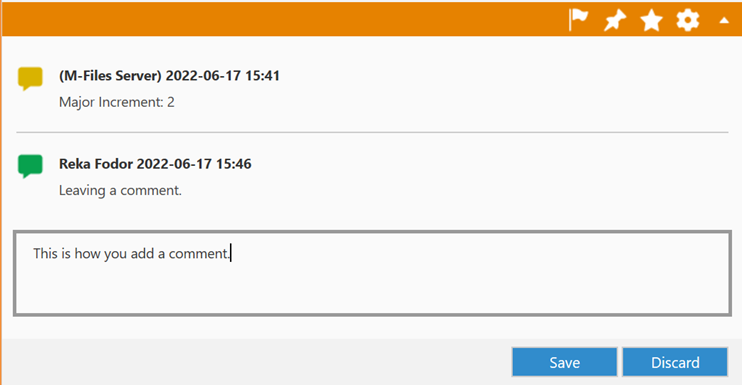
Another item contained in the top section of the metadata is the Comment Bubble:
![]()
![]() In this you can leave comments regarding an item.
In this you can leave comments regarding an item.
Each comment will be registered, however, it is not recommended that you use this for internal communication, as comments do not trigger any notifications, so they are easy to miss. It is also important to note that after the item is approved, comments get locked, so you will not be able to add more.
If you need to add any comments regarding the file, you can do so by clicking on the blue speech bubble. This will open the Comments interface.
Write your comment and click on save.
With each Major version update the system will add an automatic comment, so you can easily track which version comments were tied to.
Section 10: Preview
If there is no need to modify a document, you can click on the Preview tab in the Right Pane. In this mode, you can easily browse the document content.
Most common file formats are supported by the preview function e.g., all MS Office and Picture/Video formats.
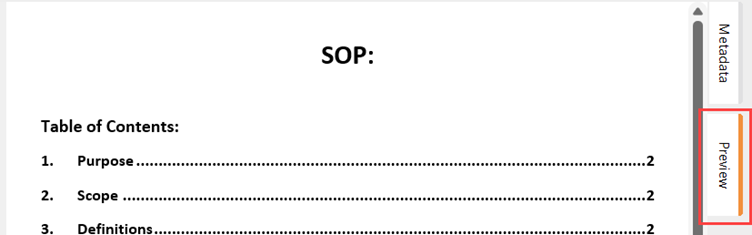
NOTE: The preview pane will not show the header and the footer of the document, unless you are looking at an already released version in PDF.
Section 11: Visual Workflows
The visual workflows provide users with a graphical representation of workflows in SimplerQMS, enhancing accessibility and comprehension of processes. With the Visual Workflow feature enabled, you can easily identify the next and previous steps within your workflow. This visual representation acts as a roadmap, simplifying decision-making and allowing you to anticipate required actions. All users have access to workflows within SimplerQMS.
To access workflows for documents and objects:
I. Launch SimplerQMS on the Windows Client.
a. Please note that this feature is currently available exclusively on the Windows Client version.
II. Click on the document or object you wish to view the workflow for
III. Click on the Workflow Tab in the Right Pane
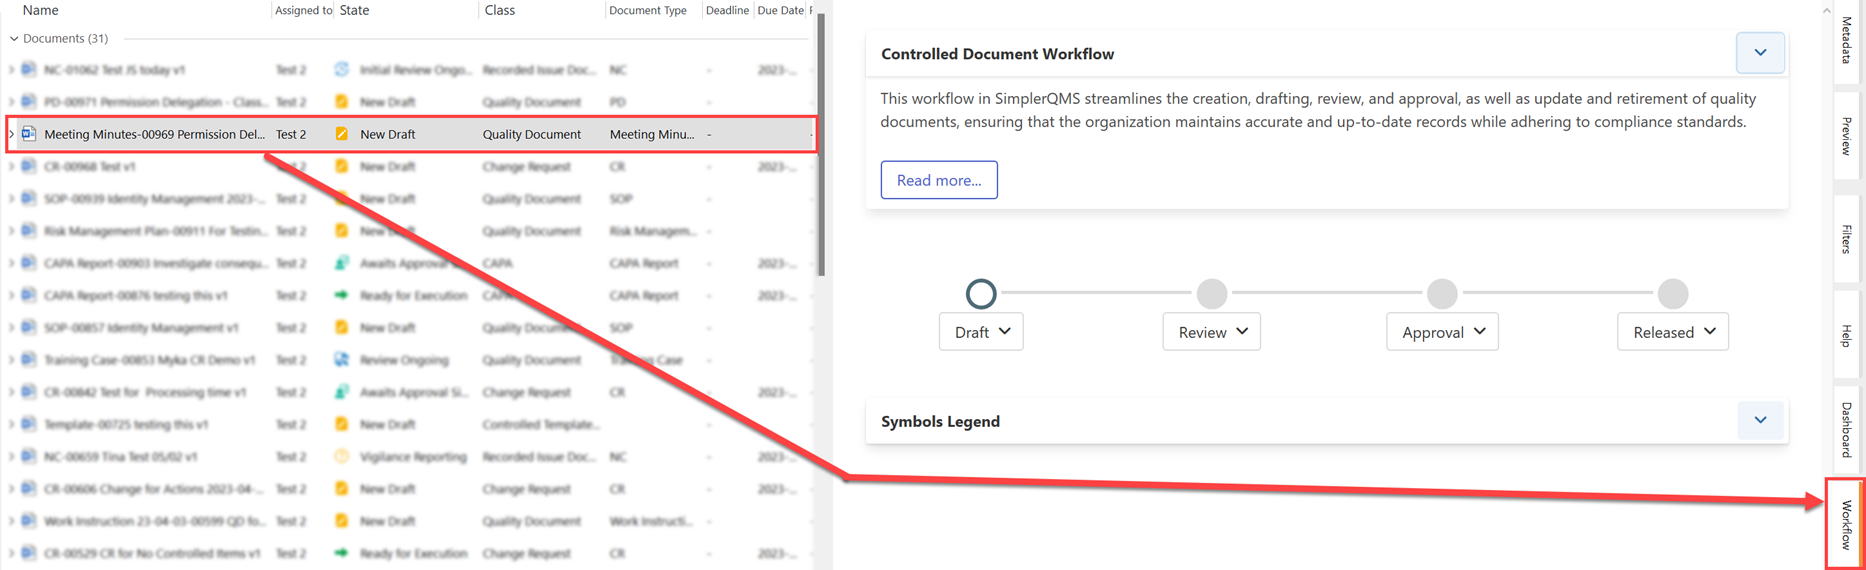
IV. Within the workflow section, you will now have the option to view your workflow in a graphical format. For detailed information click on the cards to expand the step descriptions:

V. In addition to the visual representation, you can access more information by utilizing links to the knowledge base.
a. If you require detailed context or information about a specific step or aspect of your workflow, simply click on the relevant link to access the knowledge base.
Section 12: Quick Search
Quick Search is a useful way to look for items in the vault. It looks for objects that contain the search word in the file contents or metadata.

In the search field, enter a search string that has to do with the object, such as the title, the person who has edited it, or a process it’s related to, and click the search button.
Adding of words to the quick search functions like “And” meaning that searching is filtered based on all applied words.
Search is most successful when you use the unique ID that the system assigns to items (the numbers) if you are looking to find something specific. The search can be enhanced by using the filter options. These open automatically when the search bar is clicked.
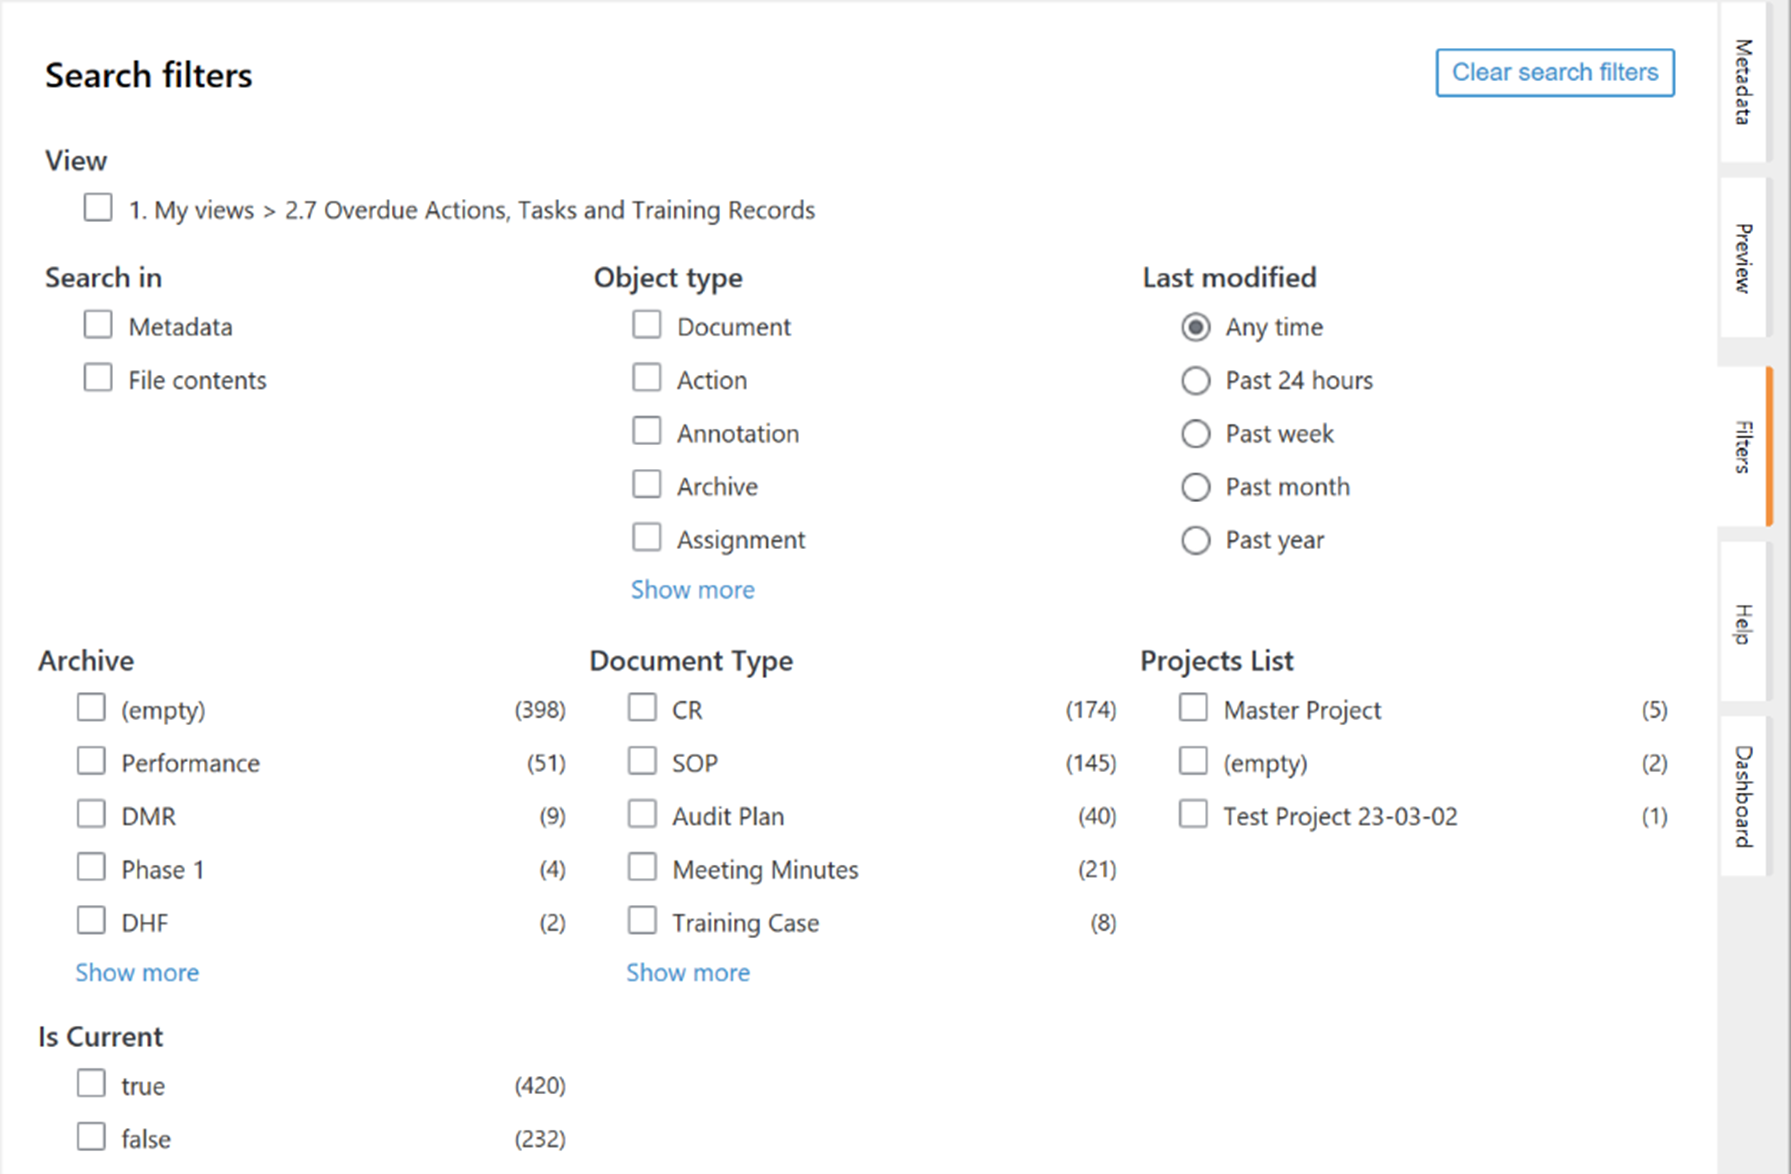
View
- Lock in the view you are currently accessing to only search for items within the view currently opened.
Search In
- You can choose whether to search within the metadata, file contents, or both by selecting the Metadata, File contents or both in the Filters tab. By default, both metadata and file contents are searched.
Object Type
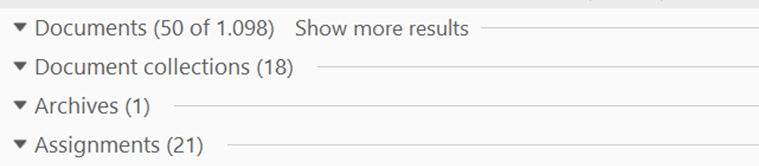
- The list includes all object types, and you can filter for each separately, or multiple together. When the search functionality is used, the listings area shows all the relevant items in groups based on object types.
Last modified
- Filter based on the time when the item was last modified.
Archive
- The list includes all currently existing archives that are tagged on your documentation.
Document Type
- Filter by relevant document types to narrow down your search.
Project List
- Search within projects related to your documentation
Is Current
- Exclude or include documents that are retired or not current. True selection results in only active copies begin shown, while false results in objects and documents that are retired or archived.
Selected filters are retained for all subsequent searches until you close the window or log out. Toggle them as default by clicking on the padlock that appears next to them when you hover over.
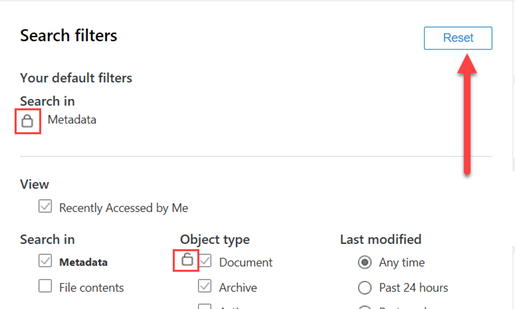
Clicking on the reset button will erase all selected default filters.
You can further narrow down your search for specific terms by placing your search query in quotation marks.

Smart Search features do not support special characters aside from those for currencies. This means that separating your search with /, &, + or other special characters will be recognized as a space between words and the character itself will not be indexed.
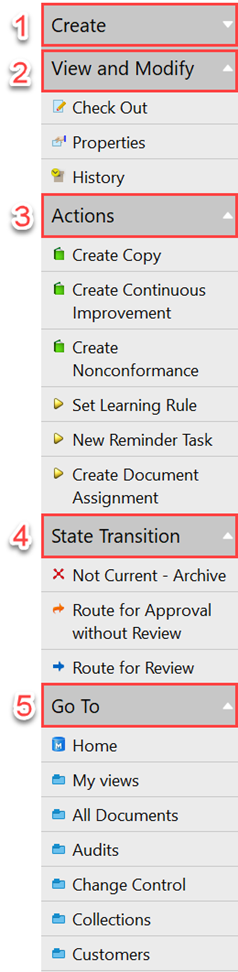
Section 13: Task Area
The Task Area is located on the left side of the user interface and contains frequently used commands and shortcuts divided into separate sections. Each section can be expanded and collapsed by clicking the arrow on the grey vertical tab. When no object is clicked, the only sections visible are Create and Go To. All other sections are only relevant for object specific operations.
1. Under the Create section, you can find the same objects that you can find in the create tab or under the Create button.
2. Under the View and Modify section, you can select object-specific operations, such as Check Out and Check In, Object Properties, and History (audit trail).
3. Actions contains shortcuts related to an object. In the example you can see document specific actions. By clicking any of these buttons, relations between the document and the item created will be established and in many cases the item class will also be defaulted.
4. State Transition is the most important section for any object. Using these buttons will allow you to move an object through its workflow. These also change depending on the current state of the object and the role that a person has assigned to them. Each of our work instructions for specific object types point out the most important state transitions options for each state.
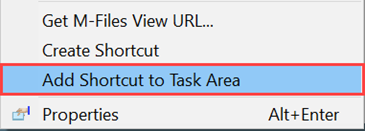
5. Go To contains the views from the 2. Main Views, which are the core views for navigating. Single-clicking any of these will take you to the corresponding view.
a. Add your own sub-view shortcuts by right click on a relevant view and clicking on “Add Shortcut to Task Area”.
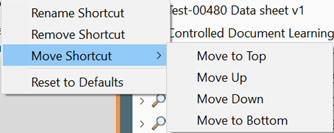
b. Rename, remove or organize these by right clicking on them. You can also reset to default.
Section 14: Transferring external documents and files to M-Files
Most documents are created from templates in the eQMS but external documents e.g., created by other stakeholders can also be added directly to the system. They can be filed under all document classes. If you are adding files that do not need to be controlled by you and just need to be filed, use the Document Attachment class. Read more about this feature in the WI: Attachment
Follow one of the ways described below to transfer document(s) and files to M-Files. After transferring a file to M-Files, fill in Metadata Card and click Save. Your file has now been saved in M-Files.
I. Add a file from Microsoft Office Programs
a. Click the M-Files Tab in Word, Excel or PowerPoint and the click Save to M-Files
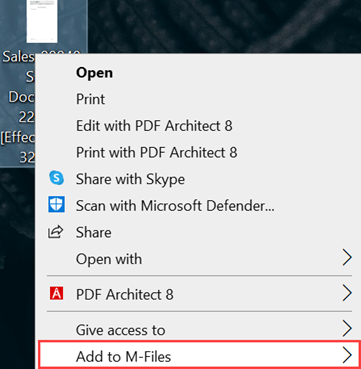
II. Add files from Microsoft Windows by Right Click.
a. Select one or more files, right-click and select Add to M-Files
III. Add by copy paste.
a. Copy the file you wish to add
b. Click on Checked out To Me and paste
Section 15: Exporting metadata and documents from M-Files
Metadata and files/documents can be exported from M-Files in the following way:
I. Search for documents, which should be included in the export
a. Go to File (click the ALT button) and choose Export
II. Export all documents, which are displayed in a view
a. Right click on the view which contains the files you want to export
The following window appears:

III. Click OK to complete the export.
IV. The metadata now be available as a CSV file with references to all the documents which are exported to one or more folders.
Section 16: Convert to Searchable PDF (OCR)
M-Files can convert images imported from external file sources into searchable PDFs using optical character recognition (OCR). This makes full-text search of scanned documents possible. After conversion, you can find the PDF document by searching the actual document content.
Optical character recognition can be performed on the following file formats:
PDF, TIF, TIFF, JPG, JPEG, BMP, PNG.
To convert one or more files to a searchable PDF, select the file/s, right-click on the file/s, click Scanning and Text Recognition (OCR) and Convert to Searchable PDF.
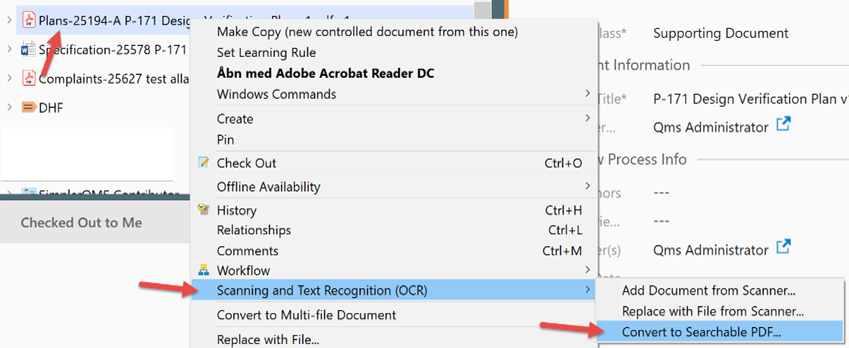
Then click Convert to complete the conversion.
Note, that the content from the PDF document will first appear in search results after the M-Files Server has updated its file index. This takes place every night.
Section 17: Creating Hyperlinks
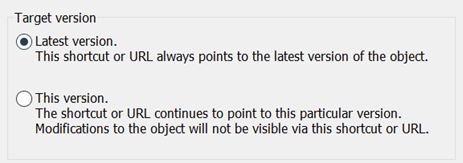
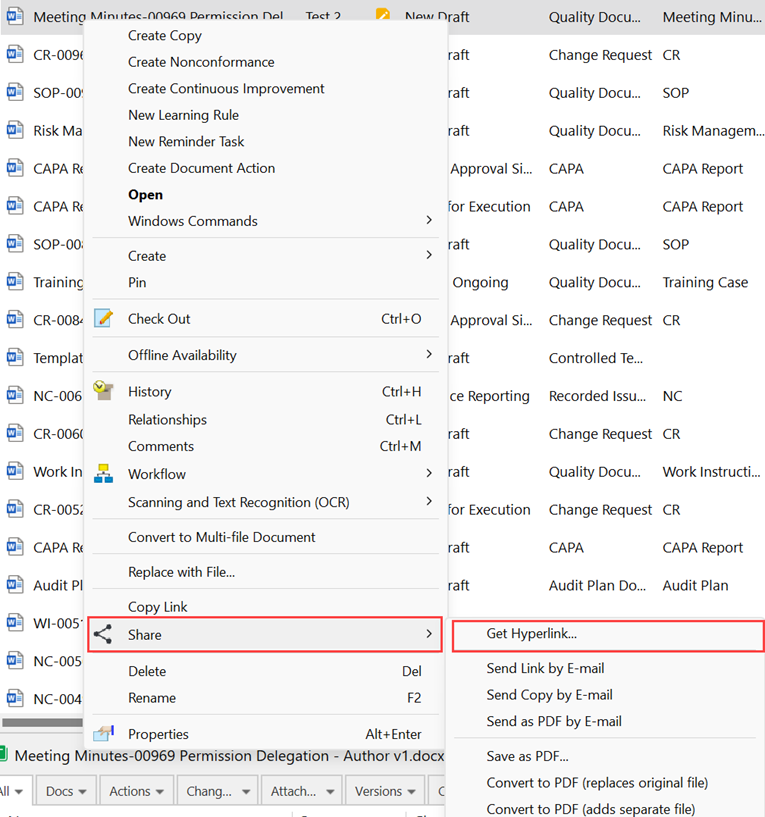
To create hyperlinks to documents, right-clicking on the document you want to link to and click Share> Get Hyperlink.
NOTE: Most relevant document to link to are the working copy and NOT the released version.
Clicking the Advanced button will allow you to create hyperlinks to either the latest version or the current version of the document.
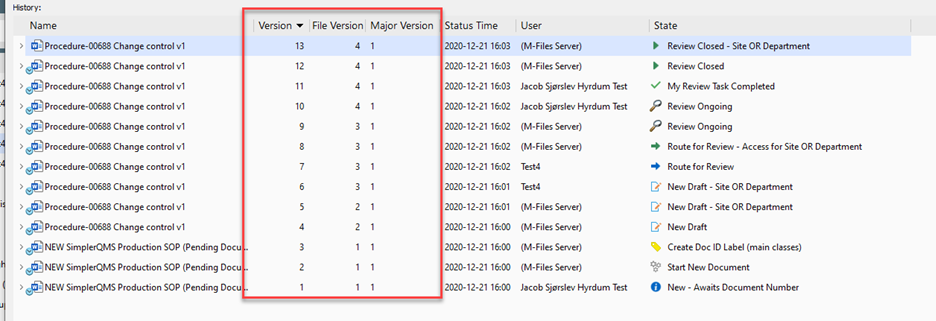
Section 18: Version History
One of the many advantages of M-Files is the fact that the earlier versions of objects are retained. You can go back in the object history and see any change in metadata and/or files.
The moment you create a document, it captures the first version of the document and saves it on the server. When you make additional actions to the document, it captures changes as a new file version.
For any version, the metadata card and file can be displayed for how it looked at that moment. The system creates a “Version” for any metadata card change both done by users and server. New file versions are created whenever the user checks in a document. Major versions are created when drafting the first version or when a released document is forwarded for updating creating a new major version.
To view the version history for a document, right-click on the document and click History.
Section 19: Creating a View
In M-Files, documents and other objects can be categorized into different views according to their metadata. Creating views is largely based on specifying the metadata used for searching and categorizing documents.
Create a new personal view by clicking Create and the click View
There are two phases in determining a view:
I. Specify a filter to ensure that the view only displays objects you want to see. Specifying filters is similar to defining search criteria.
II. Determine the folder structure of the objects. This is useful when you have a large number of objects, and you want to group them into different levels according to specific properties.
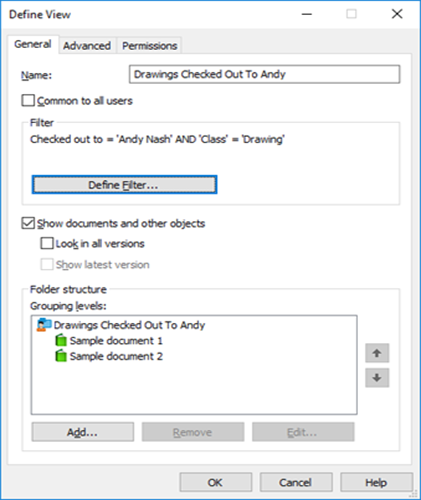
In the example shown, the documents must be checked out to the user Andy Nash, they must not have been deleted, and they must be of the type Drawing. No properties have been added to the display hierarchy in this window, so all documents that meet the criteria are displayed in a single list.
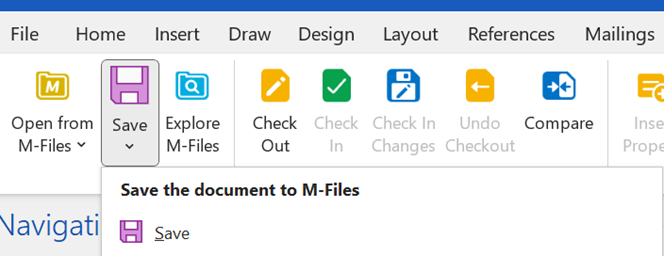
Section 20: Microsoft Office Functions Overview
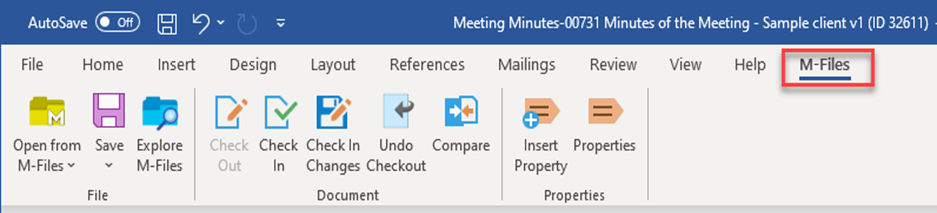
All M-Files/SimplerQMS functions are available through the M-Files toolbar.
The functions presented below are available in Microsoft Word, Microsoft Excel, Microsoft PowerPoint, Microsoft Outlook versions 2007, 2010, 2013, 2016 and Office 365.
You can open a document for reading or editing directly from the document vault. This function is also available on the File and Office menus.
This allows you to easily search for documents or browse through views.
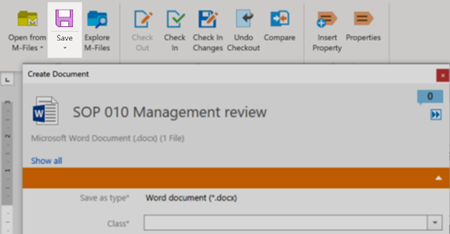
Save is the handiest way to save a new or edited document to M-Files. When you save to M-Files directly, the metadata card opens for editing just as it does when you create a new document via M-Files Desktop. This function is also available on the File in the office menu
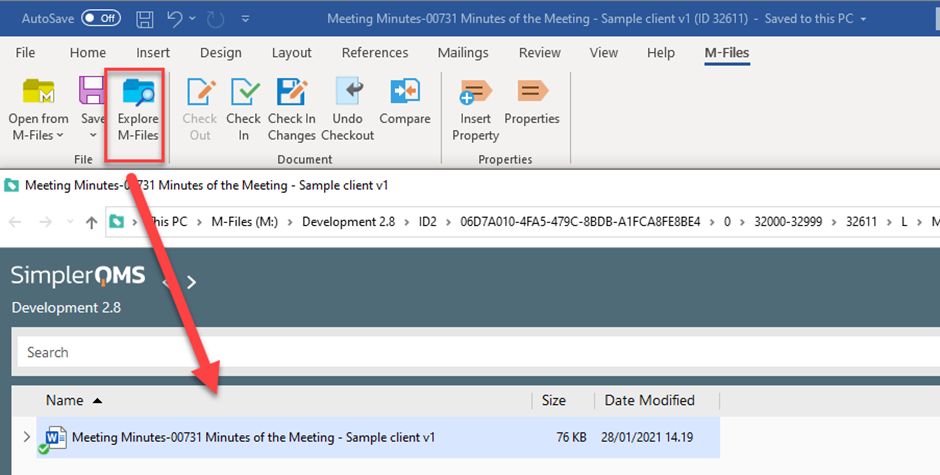
Explore M-Files is used to show the current document directly in the M-Files user interface (if the opened file is in M-Files). This makes it is easier to perform functions such as copying or sending a link to the file by e-mail.
Section 21: Check Out
Checking out a document means it is being opened to an editable or readable application, such as MS applications. When an object is checked out by a user, others cannot edit the same document. It is also important to note that if you have the document checked out on a computer, it is tied to that computer access only. If you try to open the same checked out document on your other computer, it will be locked for editing and tied to the local cache of the other computer. We recommend that at the end of each workday you check you documents in, to avoid losing data saved only locally.
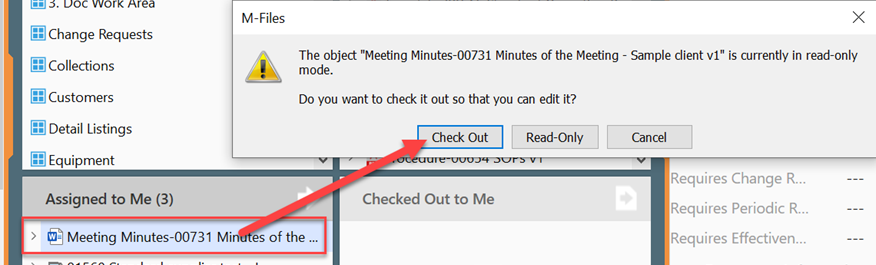
NOTE: When a document is checked out to you, you are the only one with access to modify the document, others can only view the document in read-only mode. You will know that a document is checked out to you if you see a green tick next to the document icon.

Other users will see a red stop sign instead of the checkmark as well as who the person who has the document currently checked out if the document is unavailable for editing. Find this by clicking on the document and the upper right side of the metadata card will show the details.

Section 22: Check in, and Check in Changes
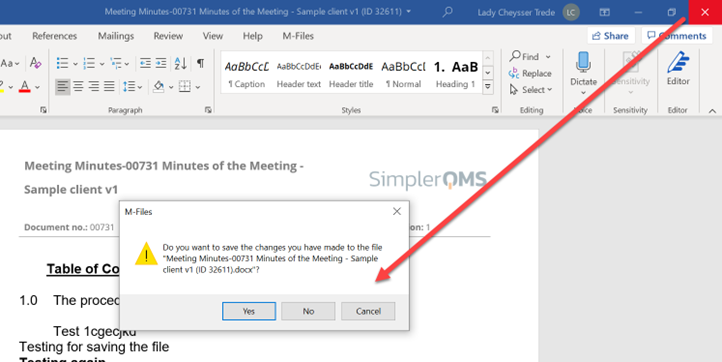
Once you are finished editing a document, use the Check In function to check in and save the document to the document vault. If you select Check In Changes, it will allow to save the changes and still be able to keep editing.

Another way of doing a Check In of a document, is to simply close the document and click “Yes” for saving. Then you are asked if you wish to check the document in or the system will check in the document automatically, id the setting is enabled in your M-Files Desktop Settings. Refer to our WI: Installing SimplerQMS M-Files on Windows and Adding Vaults
Section 23: Undo Check Out
The Undo Checkout function keeps the latest saved document and cancels any changes done by the user. If the Undo Checkout function is performed on a document that has been edited, all changes made after the document was checked out will be lost.
Note: Undo Checkout cannot be used on a single file of a multi-file document. In this case, the function is not available in the M-Files menu.
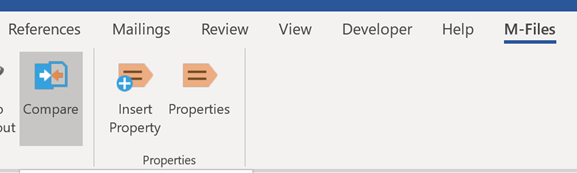
Section 24: Compare
With the Compare function, the content of the current document can be compared to an earlier version of the same document. Compare is only available in Microsoft Word.
I. Open the word document for which you want to compare changes between different versions.
II. Open the M-files tab and click the Compare button
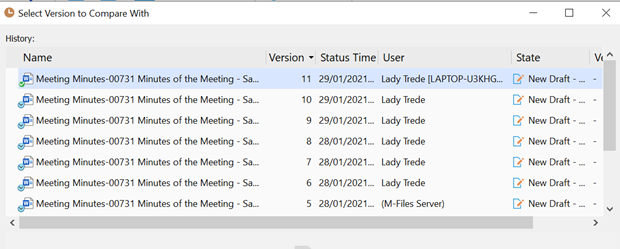
III. Select the document version you want to compare with the document you have opened. Click OK.
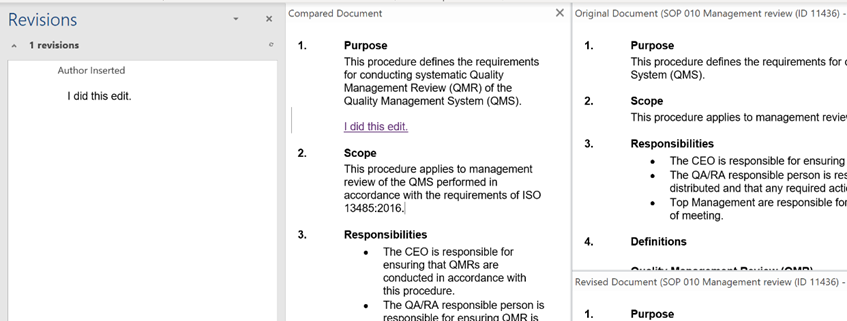
IV. The four sections Revisions, Compared Document, Original Document and Revised Document will now be visible.
Section 25: Insert Property
Document metadata stored in M-Files can be included in document contents by using the Insert Property function.
You can set up text fields or cells in Microsoft Word, Microsoft Excel, and Microsoft PowerPoint documents in which the selected M-Files properties are filled in automatically. For example, you can select a customer name and address from the document properties and insert them as the recipient’s contact information in a proposal.
Refer to our WI: Managing Templates for detailed information.
Section 26: Properties
The Properties function allows you to view document properties defined in M-Files. When you click the Properties button, the metadata card that is opened is the same as the metadata card in M-Files.
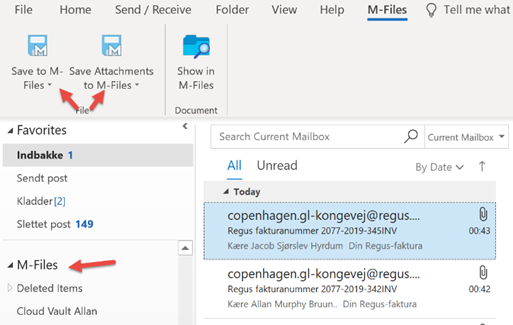
Section 27: Working with Outlook
You can save e-mails with or without attachment files simply by dragging messages to your M-Files folder in Outlook or you can save the e-mails with or without attachments.
After saving the e-mail to M-Files, the New Document box is open, and you must choose a Class for the e-mail.
Now follow the instruction for Working with Controlled Documents